
Your Guide to Microblading in Canada
- Blog Admin

- Nov 22, 2025
- 17 min read
Microblading is a game-changing cosmetic procedure that gives you incredibly realistic, natural-looking eyebrows. It’s all done with a fine, handheld tool, where a certified artist deposits pigment into the top layers of your skin, creating individual hair-like strokes that blend in perfectly with your own brow hair. This technique is an amazing solution for anyone wanting to enhance, reshape, or even completely reconstruct their eyebrows.
The Art and Science of Natural-Looking Brows
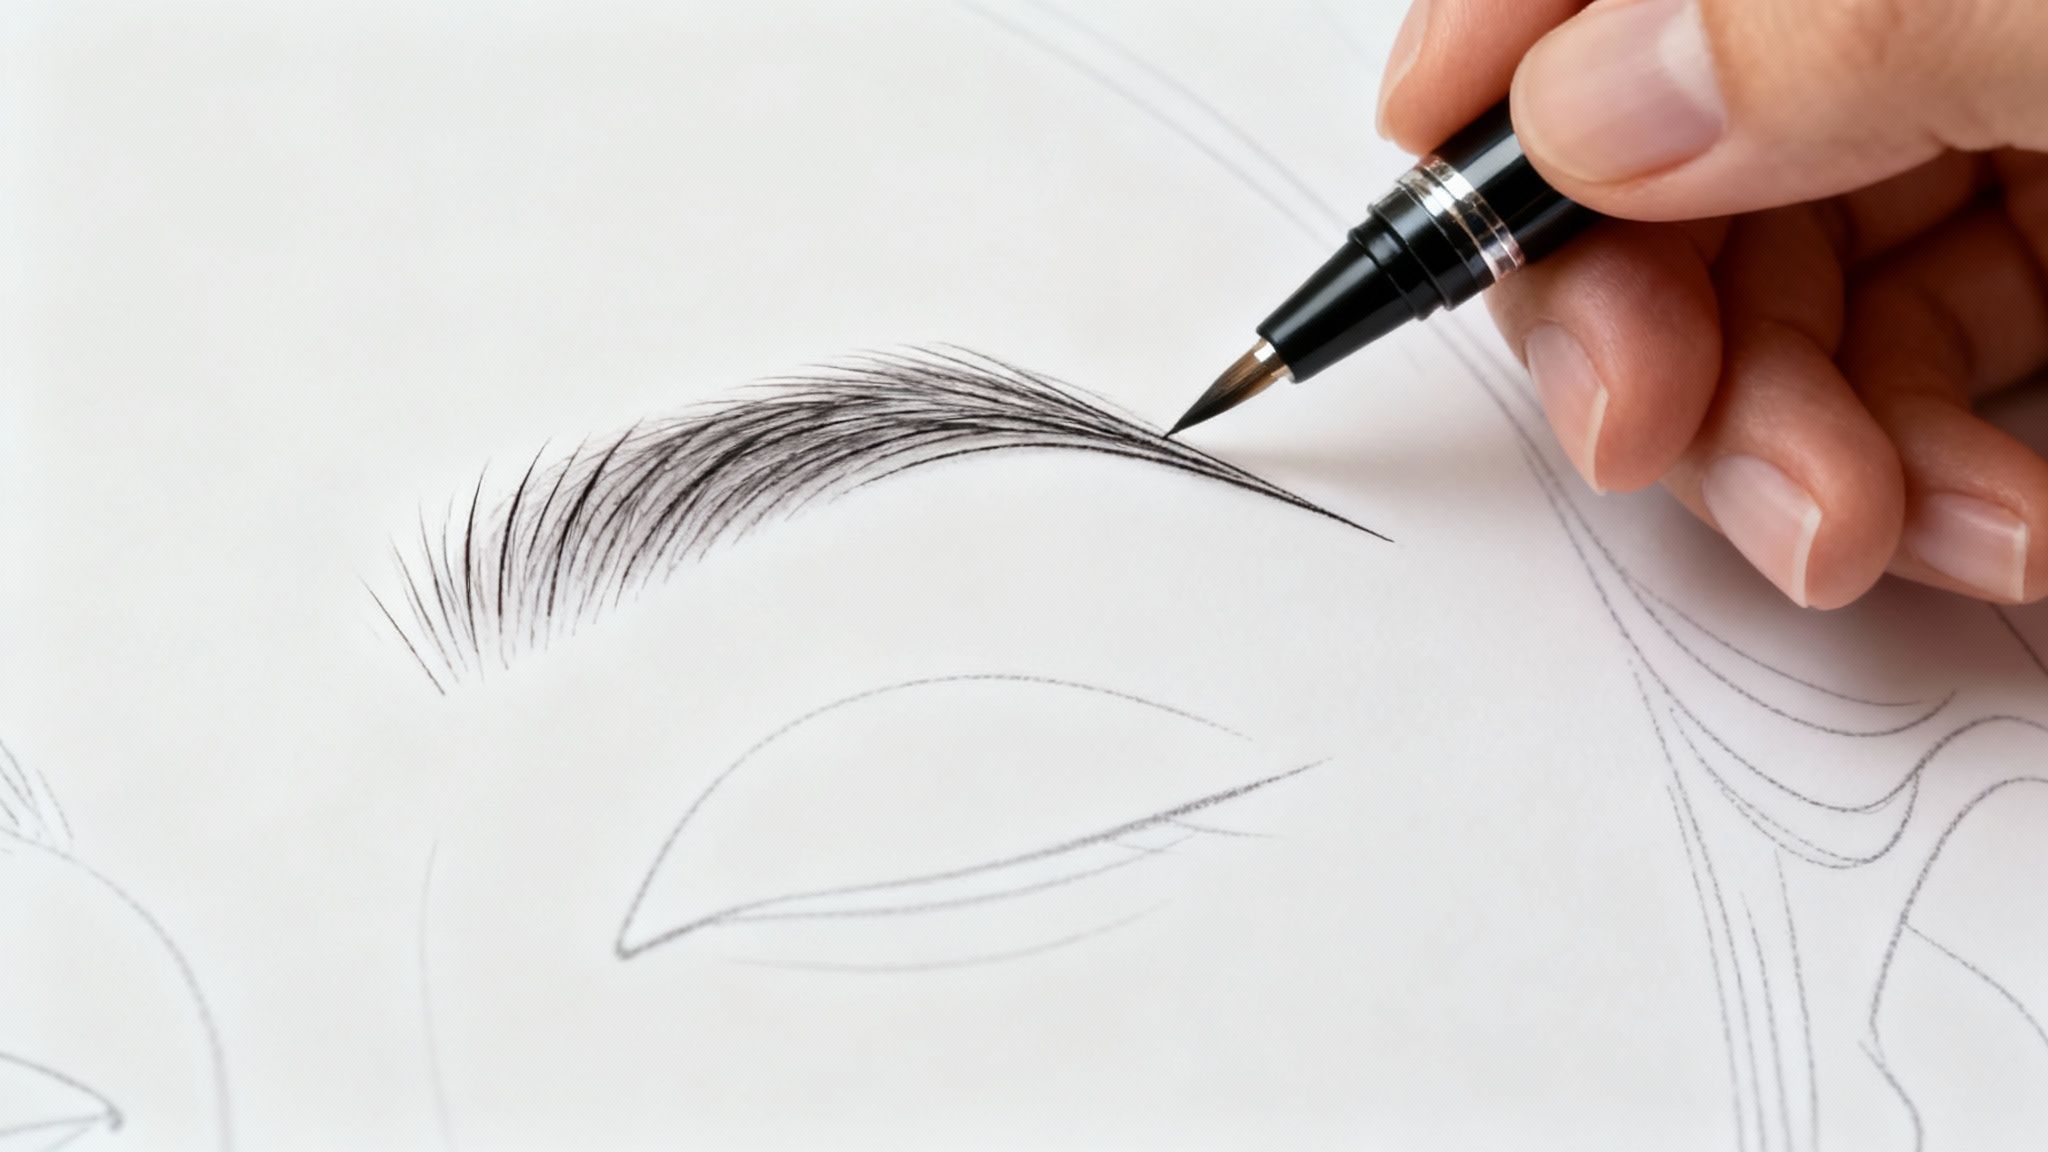
It helps to think of a microblading artist less like a traditional tattooist and more like a master calligrapher for your face. Instead of a buzzing tattoo machine that goes deep into the skin, the artist uses a precise, manual tool. This tool, fitted with a row of tiny needles, allows them to create crisp, delicate strokes that look just like real hair.
This meticulous approach is exactly what makes microblading so special. The pigment is placed just under the skin’s surface, which is why it’s a semi-permanent solution that usually lasts 1 to 3 years. This is great because it lets you make adjustments over time as your facial features change or styles evolve—unlike a permanent tattoo, which is a lifelong commitment.
Why Choose Microblading?
For so many Canadians, the real magic of microblading is its ability to deliver stunning results that still look completely natural. It's a fantastic fix for a bunch of common brow issues, giving people a big confidence boost and a much simpler morning routine. This procedure might be the perfect fit for you if you:
Want Fuller Brows: It’s an expert way to fill in sparse or thinning areas that have happened from over-plucking, aging, or other conditions.
Need Better Shape and Definition: An artist can create a gorgeous, symmetrical brow shape that perfectly frames and lifts your face.
Are Looking for a Time-Saver: Just imagine waking up every single day with perfectly shaped brows that are both waterproof and smudge-proof. No more pencils, powders, or gels!
Need to Rebuild Your Brows: For those with very little or no natural eyebrow hair, microblading can build a full, remarkably realistic set of brows from the ground up.
The heart of microblading is all about hyper-realism. The goal is never to create a solid, 'drawn-on' look. It's to enhance what you naturally have by adding texture and fullness, one tiny stroke at a time. This is the kind of artistry that clients in London, Ontario, and right across Canada are looking for.
Microblading vs Traditional Methods
While microblading is an amazing choice for creating those defined hair strokes, it’s just one way to get your dream brows. For anyone hoping to boost their natural brow growth first, exploring other options is a great starting point. Our detailed guide on how to get thicker eyebrows naturally has tons of valuable tips you can try at home.
At clinics like Skinsation Aesthetics, the focus is always on getting a result that perfectly suits your unique facial structure. The initial consultation is a really important part of the process, where a certified technician will chat with you about your goals and take a close look at your brows to make sure microblading is the right service for you. It’s this personalized approach that ensures the final look is nothing less than perfect.
A Step-by-Step Guide to the Microblading Process
Thinking about what actually happens during a microblading appointment can turn any nerves into pure excitement. The whole thing is a careful, artistic process designed completely around you, your comfort, and the brows you've been dreaming of. Let's walk through it from start to finish, so you know exactly what to expect when you come into a professional Canadian clinic.
This isn't just about adding some colour; it's a true partnership between you and your technician. Every single step is planned out to make sure the final result is a perfect match for your unique features.
The Initial Consultation and Brow Mapping
Your microblading journey really kicks off with the most crucial part: the consultation. This is where you and your artist get on the same page. You'll chat about your brow goals, what frustrates you about them now, and the exact look you're hoping for.
A great technician will listen intently before giving their professional take on the shape and style that will best suit your facial structure. Then, they'll start the brow mapping. Using special tools like calipers and mapping string, they measure your features to design a symmetrical and flattering brow shape. This blueprint gets drawn right onto your skin with a removable pencil, giving you a crystal-clear preview of what's to come.
This mapping stage is an absolute must for a quality service. It's your chance to sign off on the shape, the arch, and the thickness before anything semi-permanent happens. You have the final say, ensuring the result is something you're going to absolutely adore.
Numbing and Pigment Selection
Once you've given the thumbs-up on the brow design, the next step is all about making sure you're completely comfortable. A strong, topical numbing cream is applied generously over the entire eyebrow area. This cream needs about 20-30 minutes to work its magic, numbing the skin so you feel very little during the actual procedure.
While you're numbing, your artist will be playing colour scientist. They'll select the perfect pigment by looking closely at your natural brow hair colour and your skin's undertones. At professional clinics like Skinsation Aesthetics in London, Ontario, artists use top-tier pigments and often mix custom shades to get the most natural look possible. The whole idea is for the microbladed strokes to blend in seamlessly with your real hair.
The Microblading Application
Now for the fun part—where the real artistry begins. With the blueprint drawn and your skin totally numb, the technician will start microblading. Using a sterile, single-use handheld tool, they will gently etch tiny, hair-like strokes into the top layers of your skin.
Every single stroke is placed with intention, following the natural growth pattern of your own eyebrow hair. The artist works with incredible precision, building up the density and shape one stroke at a time. It's a calm, controlled process—never rushed. You might hear a faint scratching sound, but most clients just report feeling some light pressure, not pain. The application itself usually takes about an hour to an hour and a half.
This careful application involves:
Creating the Framework: First, the artist puts in the main strokes that build the overall shape and structure of the brow.
Adding Density: Next, they go back in to add finer, smaller strokes between the main ones, creating that look of fullness and texture.
Perfecting the Details: Lastly, they make tiny tweaks to ensure everything is perfectly symmetrical and blends flawlessly with your existing hair.
The Final Reveal and Aftercare Instructions
Once the last stroke is in place, a final layer of pigment is often smoothed over the brows and left to soak in for a few minutes. This is called a "pigment mask," and it helps lock in the colour for great saturation.
Then, the excess pigment is gently wiped away, and you get the big reveal! Your new brows will look sharp, defined, and a bit darker and bolder than they will once they're healed. Don't worry, this is totally normal. Before you go, your technician will give you detailed aftercare instructions and a special ointment to help your new brows heal up perfectly. Following these instructions to the letter is key to getting the best colour retention and beautiful, long-lasting results.
The Microblading Healing and Aftercare Timeline
Getting incredible microblading results isn't just about the artist's skill—that's only half the story. The other, equally important half, is all on you. Your commitment to proper aftercare is what truly protects your investment, making sure those crisp, delicate hair strokes heal perfectly and the pigment stays true to its intended colour.
When you know what to expect during the healing process, you won't be caught off guard by the temporary changes your brows will go through. It’s a journey that takes a little patience, but the payoff is huge: waking up every single day with flawless, ready-to-go brows.
This diagram gives you a quick visual of the procedure itself, breaking down how we get from consultation to the final, stunning result.
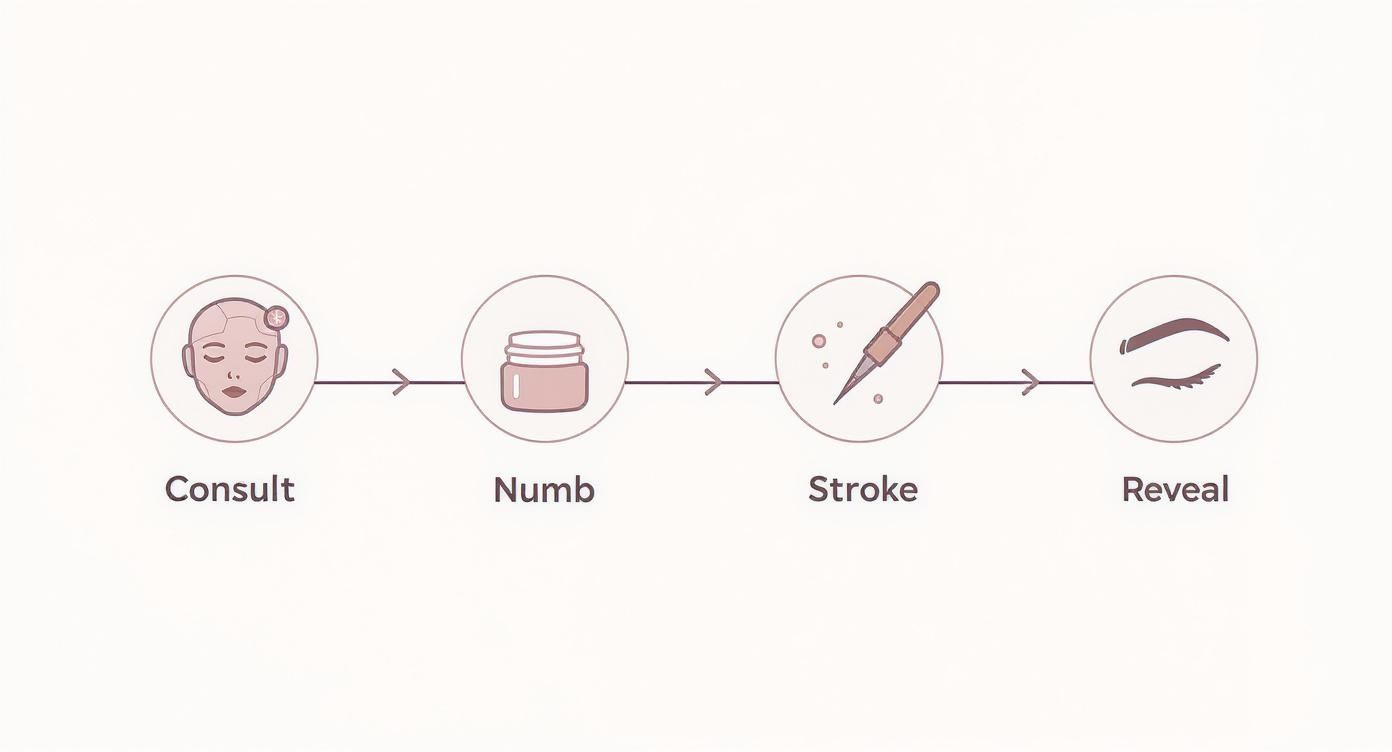
As you can see, every part of the process, from meticulously mapping your perfect shape to the precise application of each stroke, is planned out for the absolute best outcome.
The First Week: The Bold and Dark Phase
Right after you leave your appointment, your new brows are going to look dark, bold, and super defined. Don't panic! The pigment is fresh and sitting right on the top layer of your skin, which always makes it look way more intense than the final, healed look. This is completely normal.
For the first 24-48 hours, you might also notice a bit of redness or slight swelling, but this usually calms down very quickly. Your main job is to follow your technician’s instructions for gently blotting the area and applying a paper-thin layer of the aftercare ointment provided. This creates a protective shield while still letting your skin breathe.
Around days 4 to 7, you’ll hit the scabbing and flaking stage. Your brows might feel a little dry, and you'll see tiny scabs or flakes start to form.
CRITICAL: Do not, under any circumstances, pick, scratch, or peel the scabs. Let them fall off on their own. Picking them off early can rip the pigment right out of the skin, leaving you with patchy brows and poor colour retention.
Weeks Two to Four: The "Ghosting" Phase
Once the flaking is over, you might look in the mirror and think, "Where did my brows go?" It can seem like the colour has vanished. This is called the "ghosting" phase, and trust us, it's a totally normal part of your skin's healing cycle.
Basically, a fresh, new layer of skin has grown over the pigment, temporarily hiding the strokes and making them look faded. Just hang in there! Over the next couple of weeks, the colour will slowly blossom and reappear as your skin fully settles. By the end of week four, you'll see the true, softened colour of your beautiful new brows.
A Look at the Healing Process Day by Day
The healing journey can feel like a bit of a rollercoaster, but knowing what's coming makes it much easier to handle. Here's a timeline of what you can typically expect.
Timeframe | What Your Brows Look Like | What You Should Do |
|---|---|---|
Days 1-4 | Dark, bold, and sharply defined. Minor redness/swelling. | Gently blot brows as instructed. Apply a very thin layer of aftercare ointment. Avoid all moisture. |
Days 5-7 | Starting to feel dry and itchy. Light scabbing or flaking begins. | Do NOT pick or scratch! Let flakes fall off naturally. Continue with aftercare ointment. |
Days 8-12 | Flaking continues. Brows will appear patchy and much lighter in colour ("ghosting"). | Trust the process. The colour is temporarily obscured by new skin. Continue keeping them dry. |
Days 13-21 | The "ghosting" phase is at its peak. Brows look very faded. | Be patient! The colour is slowly starting to return from underneath the healing skin. |
Days 22-30 | The true colour and definition start to reappear. Brows look softer and more natural. | Your brows are almost healed. You can see what your final results will look like before the touch-up. |
Days 42+ (6 Weeks) | Brows are fully healed. The colour is settled. Any patchy spots are visible. | Time for your mandatory touch-up appointment to perfect the shape and fill in any gaps. |
This timeline is a great guide, but remember that everyone heals slightly differently. The most important thing is to follow your aftercare instructions to the letter.
The Essential Aftercare Checklist
Following a strict aftercare routine is completely non-negotiable if you want the best results. The goal is to protect your new brows from moisture, bacteria, sun, and irritation to ensure fantastic pigment retention.
What You Must Do:
Keep Them Dry: For the first 7-10 days, you have to avoid getting your brows wet (other than the gentle cleaning shown to you). That means no swimming, saunas, hot tubs, or long, steamy showers.
Apply Ointment: Use the aftercare balm provided, but use it sparingly. A tiny, rice-grain-sized amount is all you need to keep the area from drying out without smothering the skin.
Be Patient: Let your body do its thing. The changes in colour and texture are all part of the journey to gorgeous, healed brows.
What You Must Avoid:
Sweat: Sweat is the enemy of healing microblading because of its salt content. You must avoid intense workouts for at least one week.
Sun Exposure: The sun is a tattoo's worst enemy. Direct sunlight and tanning beds will cause the pigment to fade fast. Wear a hat if you're going to be outside.
Skincare & Makeup: For at least two weeks, keep all makeup, cleansers, lotions, and especially active skincare (like retinoids or acids) far away from your brow area.
Touching: Fight the urge to touch, rub, or inspect your brows up close. Your fingers can introduce bacteria and disrupt the delicate healing process.
By sticking to these rules, you give your skin the perfect environment to heal properly and lock in that beautiful pigment. This commitment to aftercare is your ticket to loving your long-lasting microblading results.
Comparing Microblading to Other Brow Treatments
With so many ways to get amazing eyebrows these days, it’s easy to feel a little overwhelmed by all the choices. Picking the right treatment really comes down to what you’re looking for, your skin type, and your daily lifestyle.
To figure out what’s best for you, it helps to see how the crisp, natural look of microblading stacks up against other popular methods. Microblading is famous for creating incredibly realistic, individual hair strokes, but understanding the alternatives will make it clear why it might be the perfect fit for you.
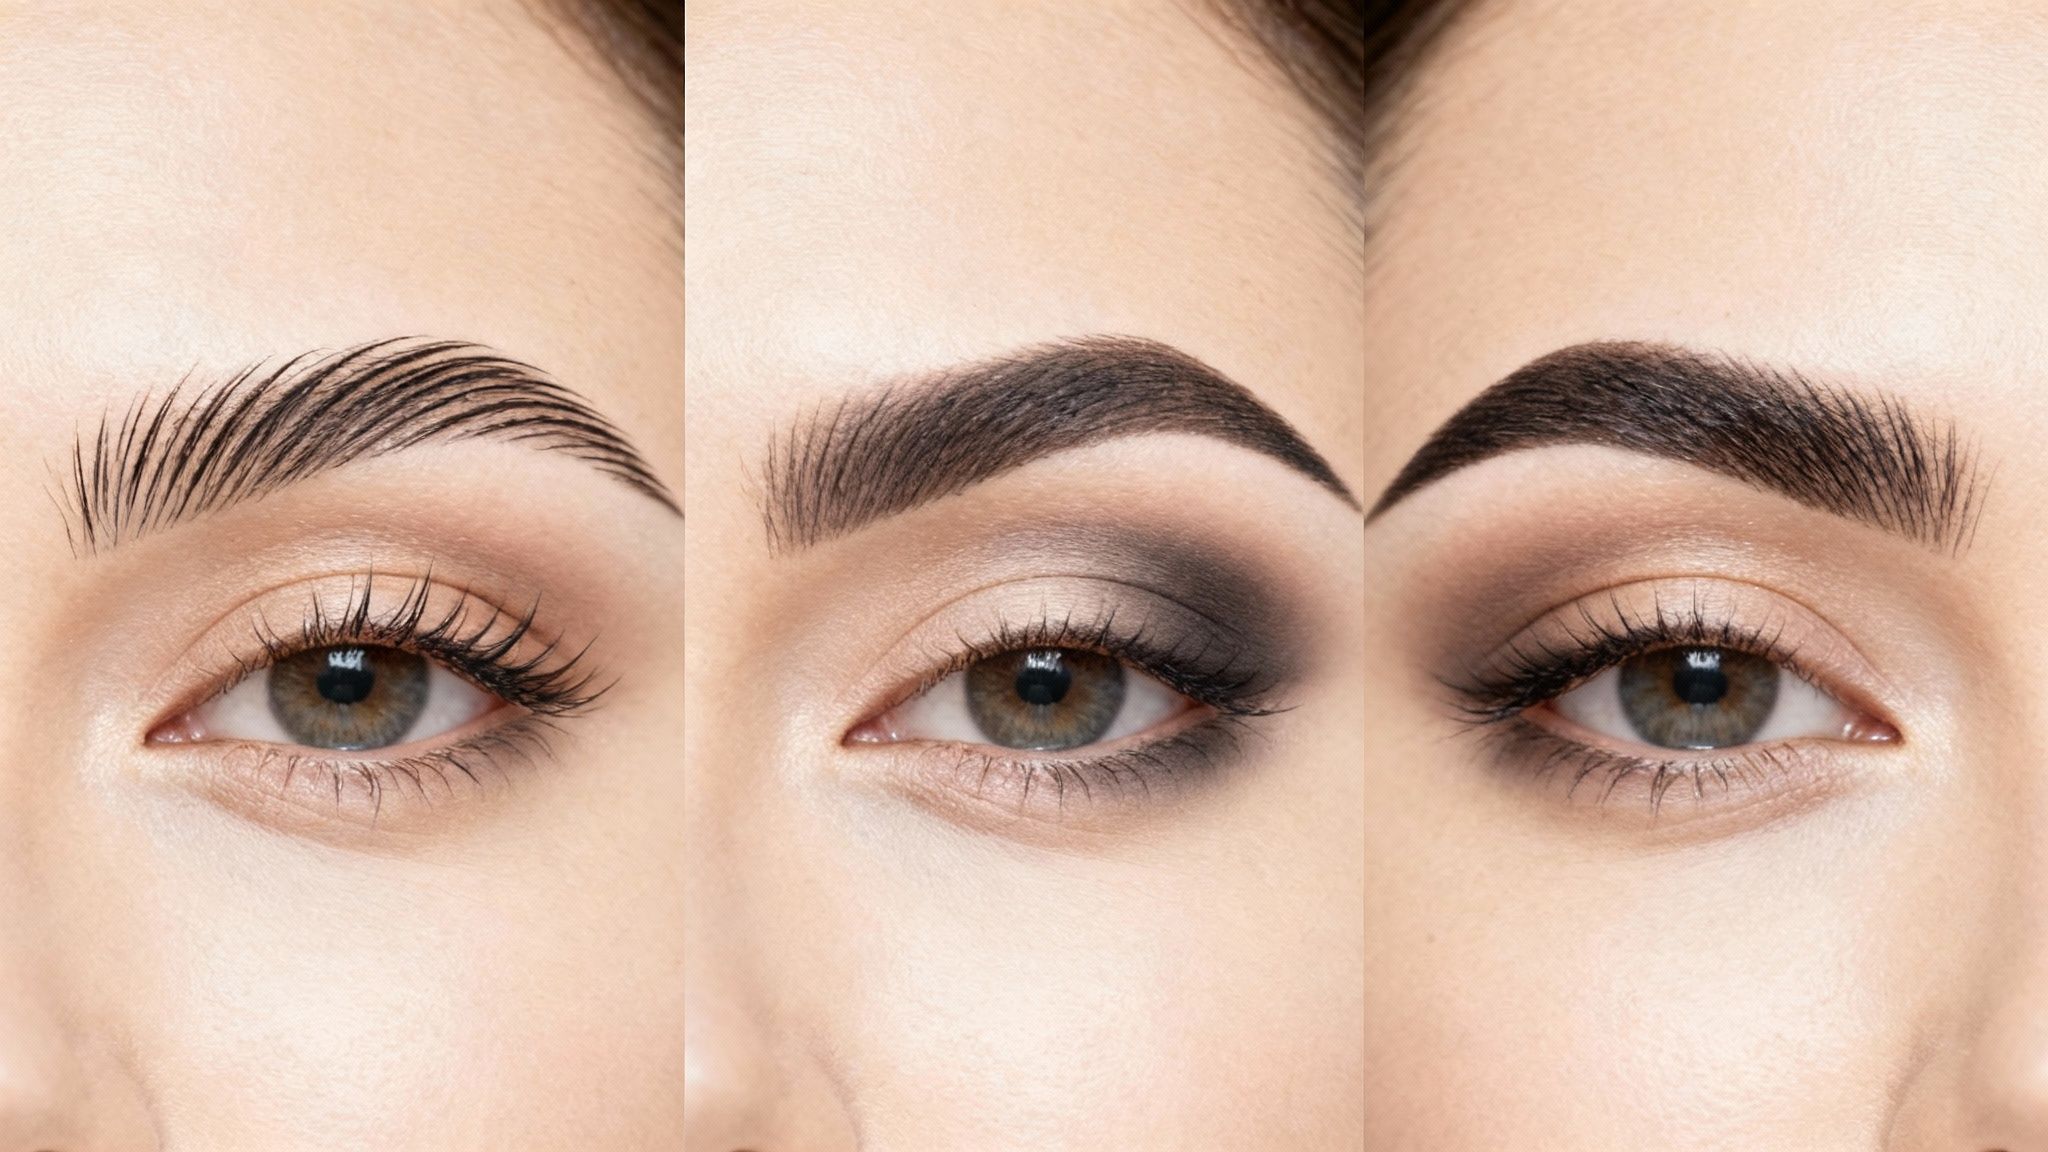
Microblading vs. Microshading: The Hair Stroke vs. The Powder Effect
The most common comparison you’ll hear is between microblading and microshading, which also goes by names like "ombré brows" or "powder brows." While they’re both types of semi-permanent makeup, the way they're applied and the final look couldn't be more different.
Think of it like drawing: microblading is like using a super-fine pen to create precise, individual lines. Microshading is more like using a soft pencil or powder to gently fill in colour.
Microblading uses a manual tool to etch tiny, crisp hair strokes into the skin, making it perfect for filling in sparse brows with a natural-looking texture. On the other hand, microshading uses a machine to deposit tiny dots of pigment, creating a soft, filled-in look that mimics eyebrow powder. The "ombré" style gets its name because the artist makes the brows lighter at the front and gradually darker towards the tail for a beautiful, faded effect.
A popular choice is the "combination brow," which blends both techniques. Your artist might use microblading for natural hair strokes at the start of your brow, then add microshading through the arch and tail for extra density and definition. It’s the best of both worlds!
Here at Skinsation Aesthetics, we’ve honed our skills in the art of microblading to give our London, Ontario clients those beautifully defined, realistic results they’re after. Our focus is on perfecting the hair-stroke technique for a flawless, natural enhancement. We do not offer microshading or ombré brows, as we specialize in the hyper-realistic look that only true microblading can provide.
Comparing Brow Enhancement Techniques
Breaking down the specifics can make your decision a whole lot easier. Each method has unique benefits and is better suited for certain skin types and aesthetic goals. Even traditional shaping methods play a part in your brow journey; for more on that, check out our guide on eyebrow threading vs waxing.
To help you compare the most popular options side-by-side, here’s a straightforward table.
Feature | Microblading | Microshading/Ombré | Traditional Tattoo |
|---|---|---|---|
Technique | A manual handheld tool creates fine, individual hair-like strokes in the top layer of the skin (epidermis). | A digital machine deposits tiny dots of pigment, creating a soft, shaded, powdered look. | A tattoo machine injects ink much deeper into the skin (dermis), just like a body tattoo. |
Final Look | Hyper-realistic and natural, perfectly mimicking the look of real eyebrow hair. | Soft, filled-in, and defined—very similar to wearing a good brow powder or pencil. | Can look harsh, solid, and unnatural. It's also prone to changing colour over time (often to blue or grey). |
Ideal Skin Type | Best for normal to dry skin. The fine strokes hold their crisp shape beautifully. | Excellent for all skin types, especially oily or sensitive skin, as the pigment heals more consistently. | Works on most skin types, but the result is often flat and lacks the texture of natural brows. |
Pain Level | Minimal discomfort; most people say it feels like light scratching. A topical numbing cream is used. | Very little discomfort and is often considered gentler than microblading. Numbing cream is also used here. | Can be more painful because the needle goes deeper into the skin. |
Longevity | Semi-permanent. It typically lasts 1-3 years before you’ll need a colour boost to refresh it. | Semi-permanent, often lasting a bit longer than microblading—around 2-3 years. | Permanent, but the colour and shape can blur and discolour significantly over the years, requiring removal. |
Ultimately, the best choice really comes down to you. If your goal is to fill in a few gaps and get the most natural-looking enhancement possible, microblading is an amazing choice. But if you have oilier skin or prefer a more "done up," makeup look, microshading might be your perfect match.
Understanding Microblading Costs in Canada
Let's talk about one of the first questions on everyone's mind: how much does microblading cost? It’s best to think of this as an investment in yourself, not just another beauty expense. Imagine waking up every day with perfect, smudge-proof brows—you end up saving a ton of time and money on makeup over the years.
In Canada, you can expect the price for an initial microblading procedure to range anywhere from $400 to over $900. This price almost always includes the essential follow-up session, which is where your artist perfects the final look. The cost isn't random; it's based on a few key factors that directly reflect the quality and safety of the service you're getting.
What Determines the Price Tag
The amount you invest in your brows is directly tied to the artist's expertise and the safety standards of the clinic. A higher price usually means you're paying for an artist with advanced training, years of real-world experience, and a portfolio packed with gorgeous, perfectly healed results. It’s not just about the procedure—it’s about the artistry needed to create brows that look natural and perfectly frame your face.
Several things add up to the final cost:
Artist Expertise and Reputation: An artist who is highly skilled, in-demand, and has a strong reputation will naturally charge more. Their experience is your best bet for getting that stunning, natural look you want.
Clinic Location and Quality: A professional clinic in a city centre like London, Ontario, with top-notch hygiene and a premium feel, will have different operating costs than a small, independent studio.
Included Touch-Up Session: Your initial fee should always cover the perfecting touch-up, which happens about 6-8 weeks after your first appointment. This isn't an optional step! It's crucial for filling in any spots where the pigment didn't settle and for fine-tuning the shape.
Quality of Materials: Good clinics don't cut corners. They use high-quality, sterile, single-use tools and premium pigments. These are designed to heal true to their original colour and last longer, and that quality is factored into the price.
Why Cheaper Is Rarely Better
When it comes to a semi-permanent treatment on your face, hunting for a bargain can be a huge mistake. A surprisingly low price is often a red flag. It could point to an artist's lack of experience, poor safety practices, or the use of cheap pigments that can fade into weird colours like blue, red, or orange over time.
Think of the cost of microblading as a direct reflection of quality and safety. Investing in a certified, experienced artist at a reputable clinic like Skinsation Aesthetics ensures you not only get a beautiful result but also protects your health. It’s an investment in peace of mind.
Here in the London, Ontario market, you'll find prices that are right in line with the national average for high-quality work. Always remember, fixing a bad microblading job can cost way more—in both money and stress—than just getting it done right the first time. Prioritizing the artist's skill and the clinic's commitment to safety over the price tag is the key to getting results you'll absolutely love for years.
How to Choose the Right Microblading Artist
Let's be honest: the final look of your brows comes down to one thing—the person holding the tool. Choosing the right technician is easily the most critical decision you'll make. It’s not just about getting beautiful brows; it’s about your health and safety.
When you commit to microblading, you're placing a huge amount of trust in a professional. To help you make a confident choice, here’s a straightforward checklist for finding a certified expert whose work you love and whose safety standards are top-notch.
Verify Certifications and Safety Compliance
First things first, check their credentials. In Canada, the rules for cosmetic tattooing can differ from place to place, so you need to find an artist who has completed thorough, accredited training. This isn’t a weekend course; we're talking about programs with at least 100 hours of in-depth education covering everything from colour theory to infection control.
Don't be shy—ask to see their certificates. A qualified artist will also be certified in blood-borne pathogens, which shows they're serious about hygiene. Their studio or clinic should also be licensed and regularly inspected by the local public health authority. If you're in London, Ontario, that means making sure they're in good standing with the Middlesex-London Health Unit.
An artist’s willingness to openly share their certifications and talk about their safety protocols is a huge green light. At Skinsation Aesthetics, our technicians are fully certified and adhere to the highest standards of clinical hygiene, ensuring your complete peace of mind.
Scrutinize Their Portfolio of Healed Work
A portfolio is an artist’s resume, but you have to know how to read it. Freshly done brows always look crisp and perfect right after the appointment. But the real test of skill? Healed results.
The way brows look after they've healed reveals everything about the artist's technique, from their depth control to their pigment choices. Insist on seeing lots of photos of clients at their 6-8 week follow-up, or even a year later. Are the strokes still defined, or have they blurred together? Did the colour stay true, or has it faded into an ashy or reddish tone? A great artist will be proud to show off their healed work.
Read Genuine Client Reviews
Real-life testimonials give you a peek behind the curtain. Look for detailed reviews on Google, social media, or their website that tell you more than just "I love my brows." Pay attention to what people say about the artist's professionalism, the cleanliness of the space, and how they felt during the consultation.
When you're looking at different artists, it helps to understand how reputable businesses build their online presence. For a bit more context, this guide to understanding how client reviews are generated by med spas offers a good look into how professional clinics value and manage client feedback.
The Consultation Is Non-Negotiable
Never, ever book a procedure with an artist who skips a proper consultation. This meeting is your chance to get a feel for their expertise and to see if their artistic style matches what you want.
A great artist will:
Listen carefully to your brow goals and any concerns you might have.
Analyze your skin type and facial structure to determine the best approach.
Meticulously map out a potential brow shape right on your face for you to approve.
Explain the entire process from start to finish, including aftercare and the healing journey.
This isn't a one-way street. It's a collaboration. A good consultation ensures you're a partner in designing your new brows, leading to a result you'll be happy to wake up with every day.
Still Have a Few Questions? Let's Clear Them Up
It's completely normal to have some lingering questions before you take the leap. After all, this is your face we’re talking about! This final section is all about giving you direct, no-fluff answers to the most common queries we hear from our clients, so you can feel totally confident and excited about your decision.
Is the Microblading Procedure Painful?
Honestly, most of our clients are surprised by how comfortable the process is. They usually describe the feeling as minor pressure or a light scratching sensation, but definitely not significant pain.
Before we even begin, we apply a high-quality topical numbing cream to the brow area. At Skinsation Aesthetics, your comfort is our top priority, and we make sure you’re as relaxed as possible from start to finish.
How Long Does Microblading Last?
Because it’s a semi-permanent treatment, you can expect your gorgeous new brows to last anywhere from 1 to 3 years. A few things can affect how long your results stick around, like your skin type (oily skin can sometimes cause the pigment to fade a bit faster), how much sun you get, and your daily skincare routine.
To keep the strokes looking sharp and the colour vibrant, we recommend popping in for an annual touch-up.
Think of the touch-up less like a full redo and more like a little refresh. It's a maintenance appointment to boost the colour and redefine any strokes that have softened over time, keeping your brows looking their absolute best year after year.
Who Is Not a Good Candidate?
Microblading is a fantastic solution for so many people, but it isn’t the right fit for everyone. A consultation is always the best way to know for sure, but generally, we don't recommend the procedure for individuals who are:
Pregnant or nursing
Currently undergoing chemotherapy
Prone to keloid scarring
Dealing with active skin conditions like eczema or severe acne in the brow area
Can Microblading Correct an Old Eyebrow Tattoo?
Sometimes, yes! But it really depends on how dark and what shape the existing tattoo is. If the old pigment is too saturated or the shape is unflattering, it can be tough to cover it up with new, realistic-looking hair strokes.
In these situations, the best course of action is often to lighten the old ink first. A service like the Aerolase laser, which we offer right here at Skinsation Aesthetics, can be incredibly effective for fading old tattoo pigment. This gives your artist a much cleaner canvas to work on, which is key to getting the beautiful, natural-looking results you want. It's a crucial step for anyone looking to fix previous brow work. For more tips on getting your dream brows, check out our eyebrow shaping guide for mastering your look.
Ready to wake up with flawless brows every single day? At Skinsation Aesthetics, our certified artists in London, Ontario, are passionate about creating the natural, beautiful brows you’ve always wanted. Book your consultation today and start your journey to effortless confidence.
Comments