
Eyebrow Shaping Guide: Master Perfect Brows At Home
- Blog Admin

- Jun 21, 2025
- 16 min read
Discovering Your Unique Brow Blueprint
Before you even touch a pair of tweezers, let's chat about what makes your eyebrows yours. Getting the perfect brows isn't about copying a trend you saw online; it's about crafting a shape that beautifully complements your unique features. Think of it as creating a custom blueprint for your face—a vital first step in any worthwhile eyebrow shaping guide. Understanding the relationship between your bone structure, natural hair growth, and facial symmetry is what takes your brows from good to absolutely great.
A common mistake I see, especially for those just starting their DIY brow journey in Canada, is trying to force a specific style without considering their own face. This often ends in over-plucking and a shape that just doesn't feel right. The real goal is to enhance what you've got, not erase it. Eyebrows have long been a focal point of beauty, with trends cycling from the pencil-thin styles of the past to the fuller, more natural looks we love today. You can actually explore the history of how eyebrows became so important and see just how much styles have evolved over the decades.
Finding Your Ideal Brow Shape
The secret to a flattering brow is to work with your face shape, not against it. Your bone structure is the perfect roadmap, showing you exactly where your brows should begin, arch, and end. For example, a soft, rounded brow can beautifully soften the angles of a square face, while a sharper, more defined arch adds wonderful dimension to a round face. These aren't strict rules, but guiding principles to help you create balance and harmony.
To figure this out, pull your hair back and take a good look in the mirror. What are the main contours of your face? Is it long, oval, round, square, heart-shaped, or diamond? Once you have a good idea, you can start matching it with a brow style that will truly flatter you.
Tailoring Brows to Your Face Shape
To help you find the best brow silhouette for your facial structure, I've put together a handy guide. Remember, these are fantastic starting points to help you build out your personal brow blueprint.
Face Shape to Brow Style Matching Guide
Comprehensive comparison of optimal brow shapes for different face structures
Face Shape | Recommended Brow Style | Key Features | Shapes to Avoid |
|---|---|---|---|
Oval | Softly Angled | A classic, gentle arch that follows the natural brow bone for a balanced look. | Very high arches or completely straight brows, as they can disrupt the natural symmetry. |
Round | High, Sharp Arch | The defined peak adds vertical length, which helps the face appear slimmer and more defined. | Rounded or flat brows, which can make the face appear wider than it is. |
Square | Thick, Softly Rounded | A softer curve helps to balance a strong, angular jawline, creating a more harmonious appearance. | Thin or sharply angled brows that can accentuate harsh angles rather than soften them. |
Heart | Gentle, Rounded Arch | A lower, more delicate arch creates a softer, more feminine look that complements the face shape. | Heavy, straight brows that can draw attention to the forehead, making it appear wider. |
Long | Straight or Extended Tail | A flatter brow shape helps create the illusion of a wider face, adding horizontal balance. | High arches, which can visually elongate the face even more. |
Taking the time to understand these relationships is the foundation of successful brow shaping. When you map out your features first, you’re moving beyond guesswork and starting to make choices that will truly work for you. If you're looking for an expert touch to achieve your ideal look through services like waxing and tinting, you might be interested in exploring professional eyebrow and lash services to bring your vision to life. This initial discovery phase makes sure every pluck and trim has a purpose, guiding you toward brows that feel perfectly, authentically you.
Tools That Actually Make A Difference
Once you’ve figured out your facial blueprint, the next part of any good eyebrow shaping guide is picking the right tools. Walking down the beauty aisle can feel like a lot, with countless gadgets all promising perfect brows. But here's a secret: getting salon-quality results at home doesn't mean you need a massive, pricey kit. It's about having the correct tools. Let’s cut through the noise and talk about what really works.
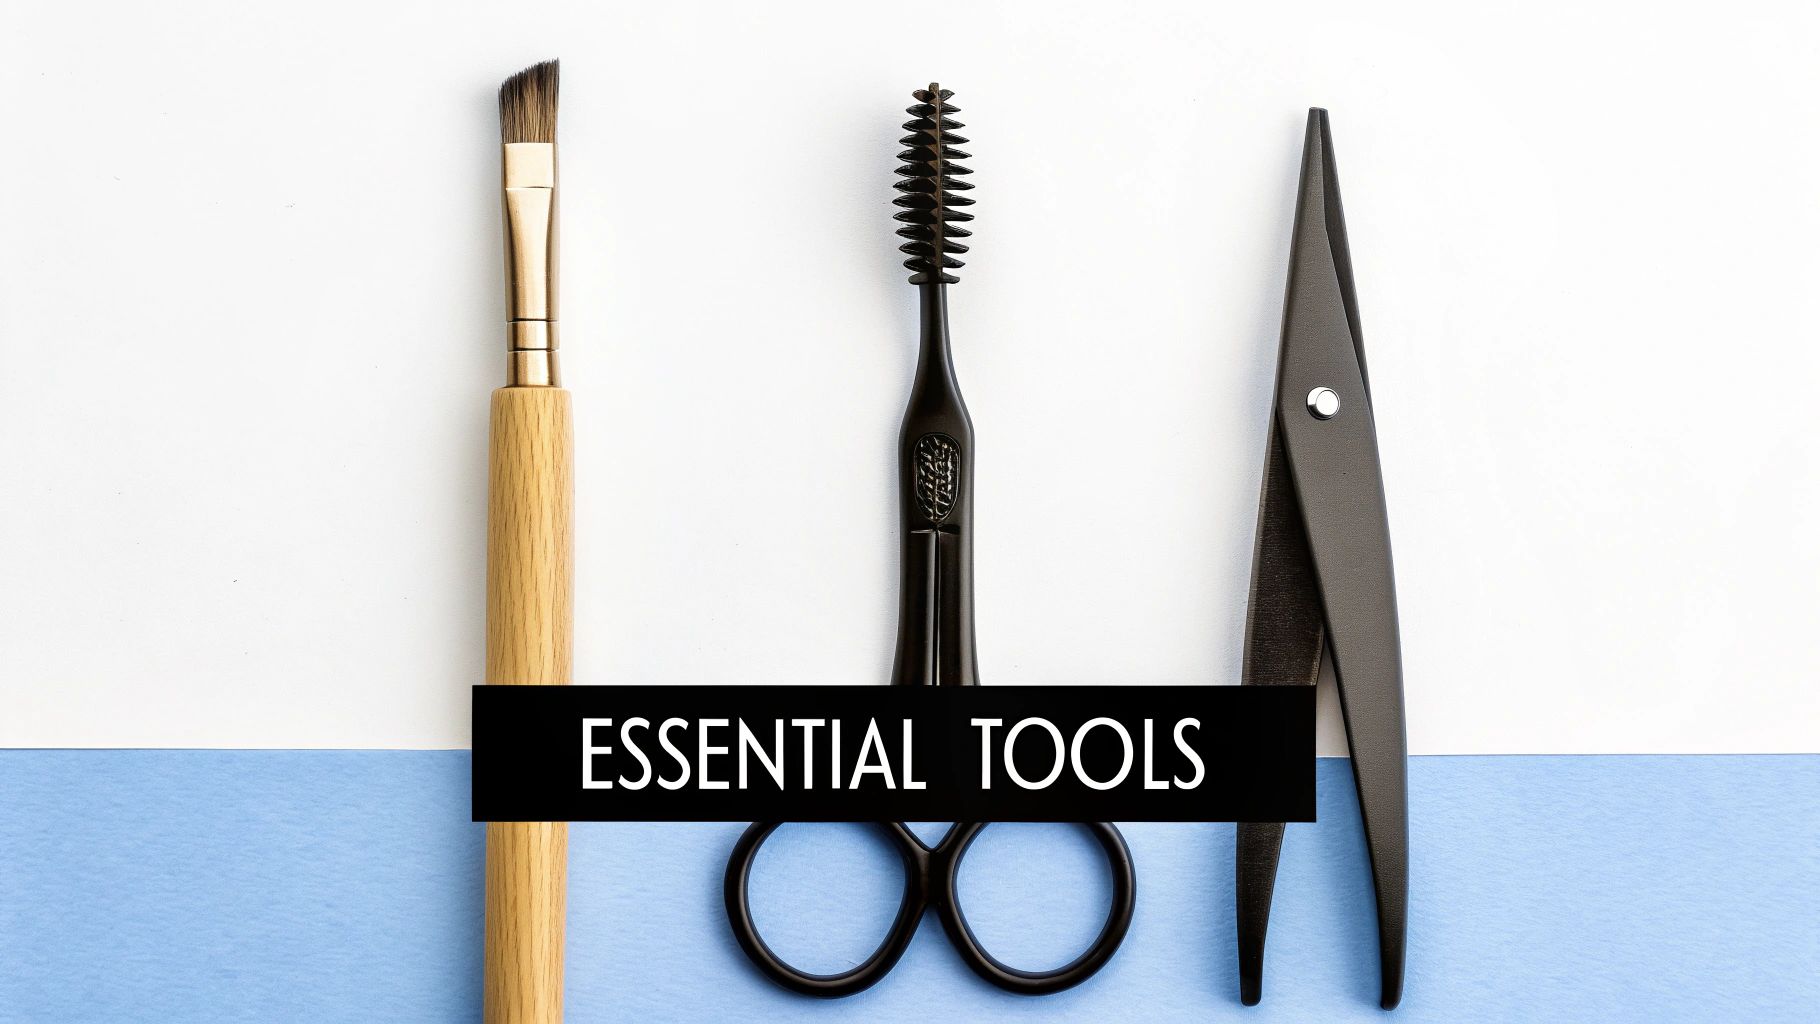
Core Essentials For Precision Shaping
Building your go-to toolkit is simpler than you might imagine. You only need a few high-quality items to start your brow journey. These are the non-negotiables that professionals and beauty lovers across Canada count on for clean, precise work.
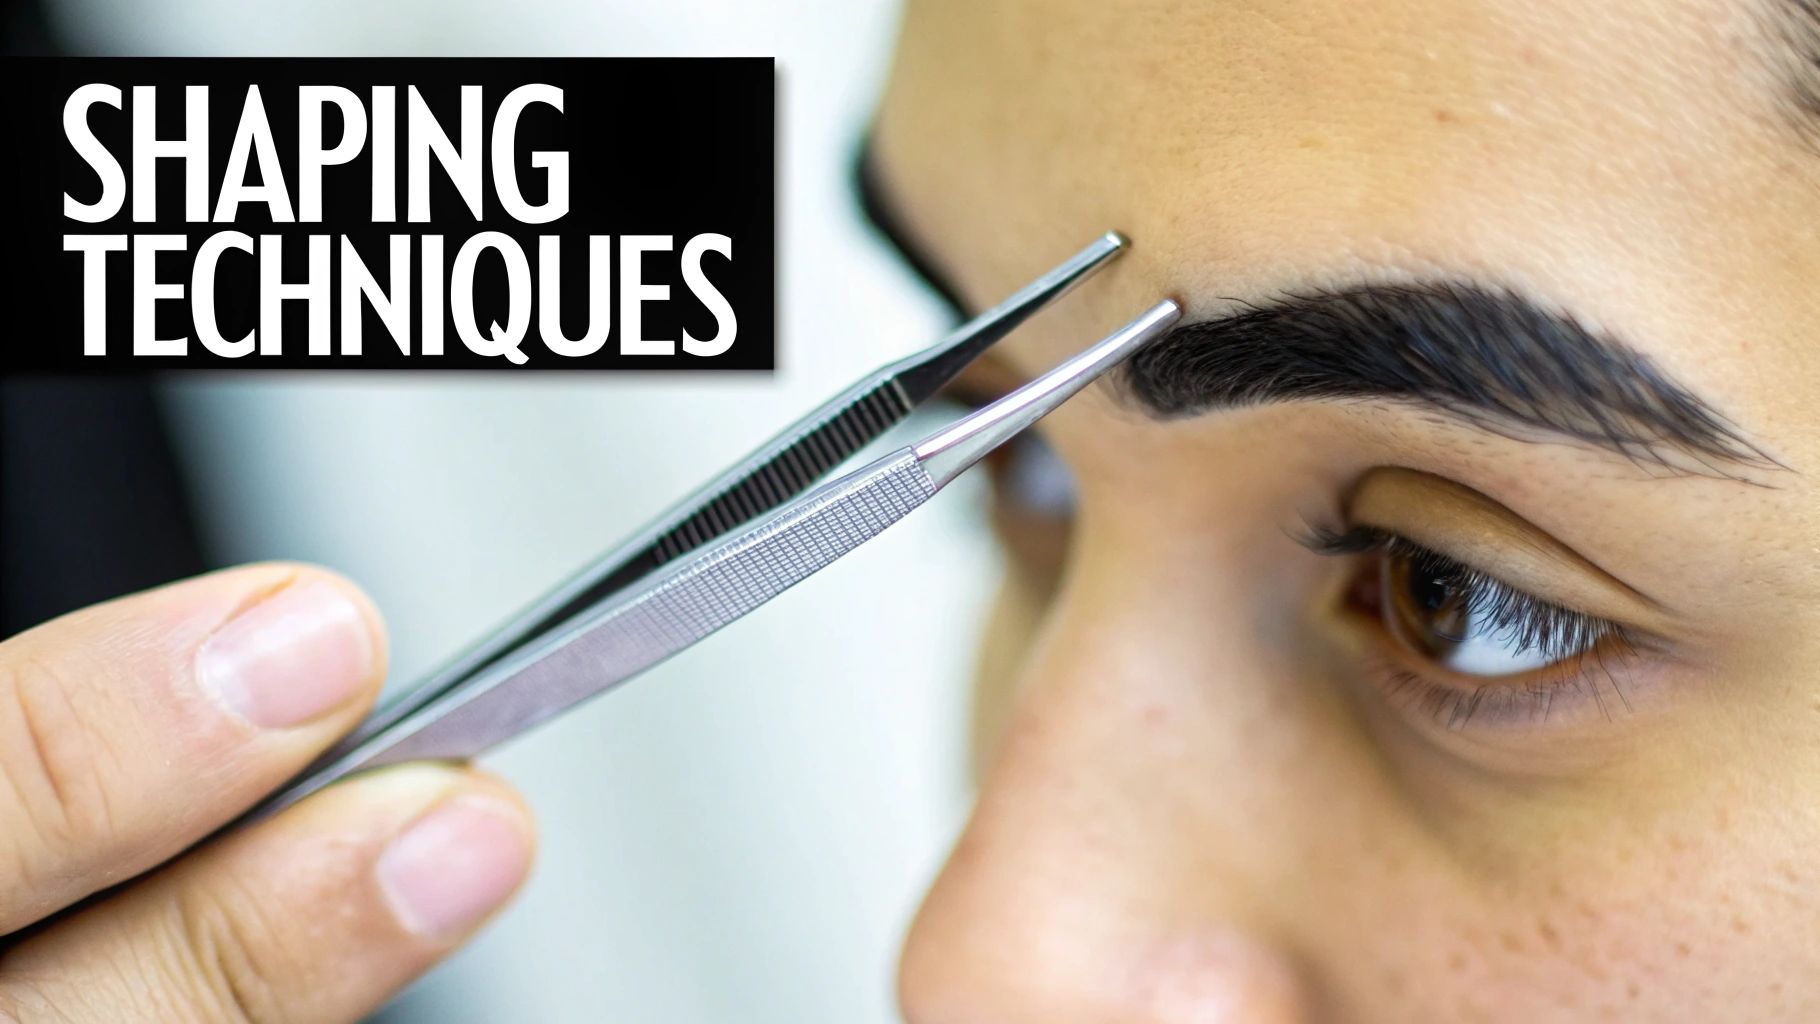
High-Quality Tweezers: This is one area where you don't want to skimp. A solid pair of slant-tip tweezers gives you the best of both worlds: a pointed end for grabbing tiny, fine hairs and a flat edge for removing a few at once. They should feel good in your hand and have a tension that isn't too stiff or loose. If you invest in a quality pair, like those from Tweezerman, they will stay sharp and perfectly aligned for years.
A Spoolie Brush: This simple tool is an absolute must-have for grooming. Before and during shaping, you'll use the spoolie to brush your brow hairs up. This helps you see their true length and spot which ones actually need a trim. It's also key for blending in brow pencils or powders for a soft, natural look.
Sharp Brow Scissors: Your regular craft scissors just won’t cut it here. Eyebrow scissors are small, sharp, and often have a slight curve designed to follow your brow line. They are made for tiny, precise trims, not for making big changes. Using a dull or oversized pair is a common mistake that can leave you with choppy, uneven brows.
Choosing Your Hair Removal Method
Beyond the basic maintenance tools, the way you remove hair depends on your comfort level, pain tolerance, and the final look you want.
Method Comparison: What's Right For You?
Method | Best For | Pain Level | Precision | Key Consideration |
|---|---|---|---|---|
Tweezing | DIY clean-ups and maintenance between appointments. | Low to Moderate | High | Best for grabbing individual stray hairs. It's easy to over-pluck if you're not careful. |
Waxing | Removing a lot of hair quickly for a very clean shape. | Moderate | Medium | Great for those with thicker, coarser brows. It takes practice to avoid mistakes. |
Threading | Creating sharp, clean lines and defined arches. | Moderate | Very High | Excellent for sensitive skin because it doesn't pull on the skin like wax can. |
Ultimately, you need to find a routine that fits your lifestyle. Many people in Canada use a hybrid approach—for example, getting a professional wax or thread every 4-6 weeks and using tweezers for touch-ups in between. This strategy is popular in beauty-forward places, where the focus is on achieving perfect symmetry. As grooming trends evolve, experts notice that clients are investing more in treatments that enhance their facial balance. You can learn more about how grooming is focusing on precision on latimes.com. Picking the right mix of tools and techniques will give you the power to maintain beautiful brows with confidence.
Mastering Professional Brow Mapping At Home
Knowing your ideal brow shape is one thing, but actually creating it is where the real fun begins. This is where a technique called brow mapping comes in. It’s the exact blueprint professional artists use to get perfect symmetry and proportion every time, and it’s surprisingly easy to do yourself. Forget about guessing and plucking—with a simple tool like a makeup brush or even a string, you can draw a map that frames your face perfectly.
This prep work is your best defence against the dreaded over-plucked, uneven brows we've all feared (or experienced!). By marking exactly where your brows should start, arch, and end before you touch a single hair, you take all the guesswork out of the equation. A huge mistake I see people make is shaping their brows in a dimly lit bathroom. Bad lighting can completely change how you see your face. Always find a spot with good, natural light to ensure what you see in the mirror is accurate.
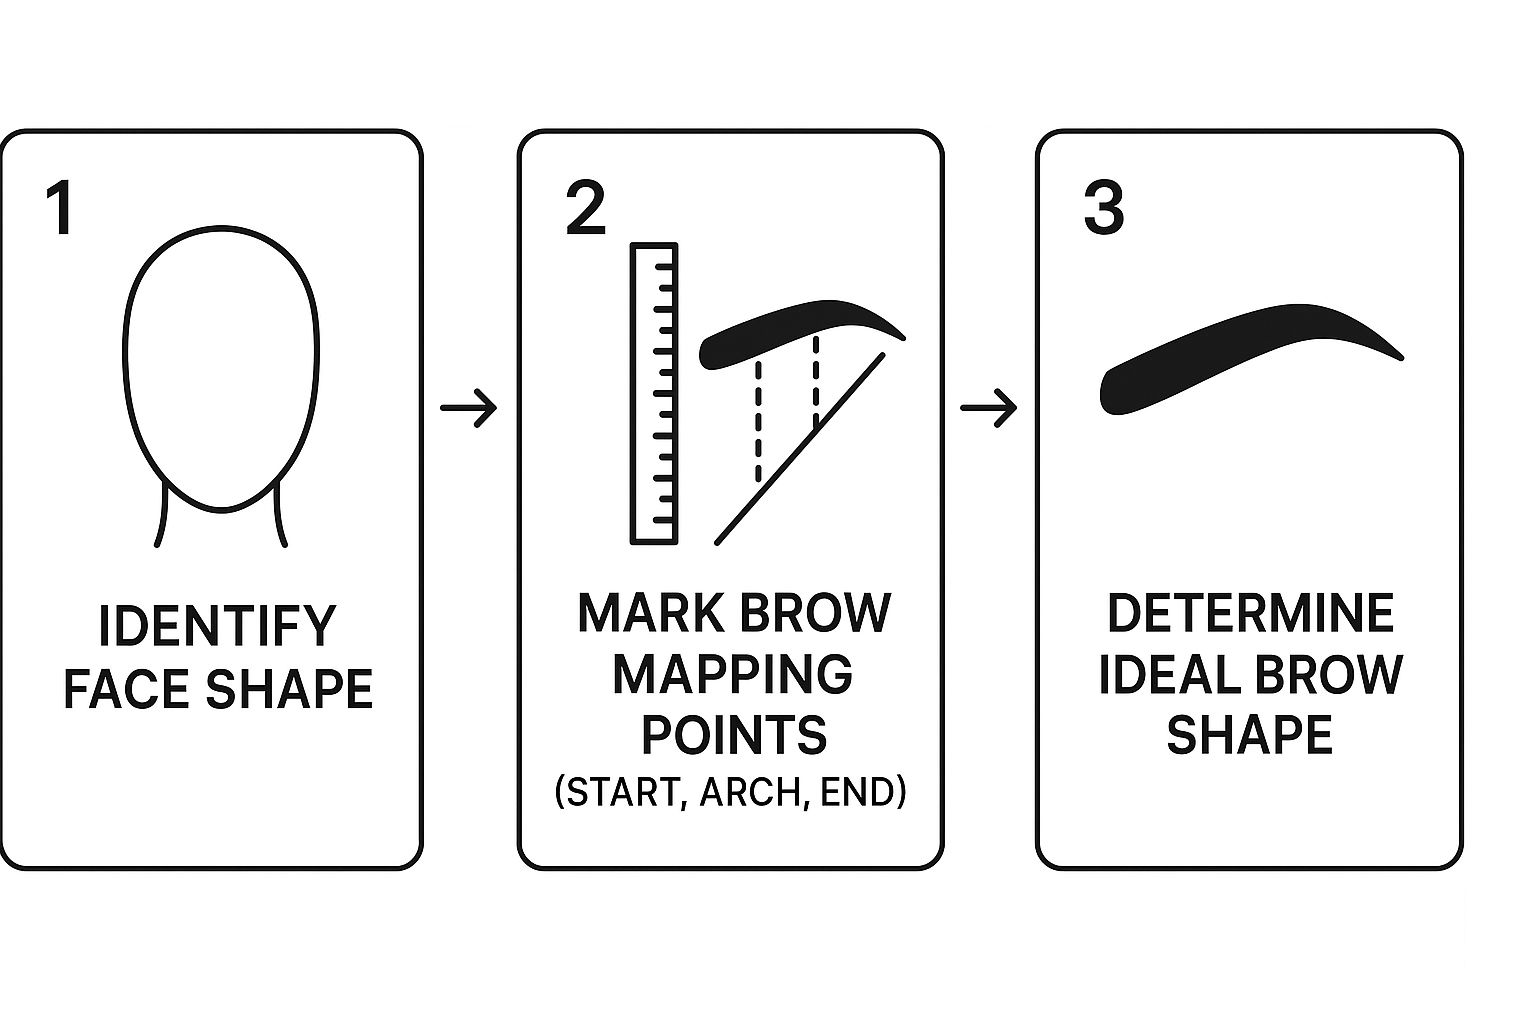
Finding Your 3 Key Brow Points
"Mapping" might sound a bit technical, but it’s really about using your own facial features to guide you. It all comes down to three key points that will give you a brow shape that’s uniquely yours.
The Start: Take your brush and hold it vertically from the dimple of your nostril straight up towards your forehead. That’s your starting point. If you start your brows too far apart, it can make your nose look wider. Too close, and it can create a constant scowl.
The Arch: Keep the brush at your nostril and pivot it, lining it up with the outer edge of your iris while looking straight ahead. Where the brush hits your brow bone is the natural highest point of your arch. Nailing this spot is what gives your eyes that beautiful, lifted look.
The End: Pivot the brush one last time from your nostril to the outer corner of your eye. This marks the spot where the tail of your brow should taper off. If you extend the tail too far down, it can make your eyes look droopy. If it's too short, it can make your eyes appear smaller.
To make this even clearer, the infographic below shows how these points work together to create a custom frame for your face.
To help you get these measurements just right, here's a handy reference table that breaks down the technique for each point and points out common mistakes to avoid.
Brow Mapping Measurement Reference
Step-by-step measurements and angles for perfect brow placement
Measurement Point | Technique | Common Mistakes | Pro Tips |
|---|---|---|---|
Start Point | Hold a straight tool (like a brush handle) vertically from the side of your nostril up to your brow. Mark this spot. | Starting brows too far apart or too close together. | Mark both brows before tweezing to check for symmetry. This point should align with the bridge of your nose. |
Arch Point | Pivot the tool from your nostril, aligning it with the outer edge of your iris as you look straight ahead. Mark where it intersects the brow. | Placing the arch too far in the centre, creating a "rainbow" shape, or placing it too far out. | For a more lifted look, you can place the arch slightly past your iris, but never beyond the outer corner of your eye. |
End Point | Continue pivoting the tool from your nostril to the outer corner of your eye. Mark this spot. | Making the tail too long (drags the eye down) or too short (makes the eye look smaller). | The tail should ideally end on the same horizontal line as the start point, or slightly higher. Avoid letting it dip lower. |
This table provides a great cheat sheet for getting consistent results. Once you've marked these three points with a soft brow pencil, you can connect them to create a clear outline. Any hairs that fall outside of this shape are fair game for removal. This careful approach is the secret behind those flawlessly shaped brows you see everywhere and is the most important part of this eyebrow shaping guide.
Working With Your Natural Hair Patterns
Think of your eyebrow map as the perfect blueprint for a house. It's essential, but the final look depends entirely on the building materials—in this case, your hair's unique texture and growth patterns. Let's be real, not all brow hairs are team players, and forcing a one-size-fits-all shape just doesn't work. This is where you graduate from following a map to skillfully working with the terrain of your own brows.
For example, if you have thick, coarse hair, you might find that just tweezing leaves you with a stubbly, undefined line. This is a classic scenario where waxing or threading would be a better choice to get that crisp, clean edge. On the flip side, if your brows are fine and sparse, every single hair is precious. Over-plucking is the enemy! Here, precise tweezing is your best friend, as it helps you avoid creating accidental bald spots. This mindset shift is about working with your brows, not against them, for a polished result that looks like you, but better.
Handling Unruly Hairs And Growth Patterns
Every one of us has a few rebellious brow hairs that just refuse to cooperate. Whether it's a cowlick that sends hairs shooting upwards or a few strays that grow in the complete opposite direction, figuring out how to manage them is key.
Cowlicks and Swirls: Your first instinct might be to pluck them, but that can leave a glaringly obvious gap. Instead, try to tame them. A strong-hold clear brow gel can work wonders to brush them into place. For extra stubborn ones, a tiny trim right at the tip can make them blend in without removing the whole hair.
Uneven Growth: It's incredibly common for one brow to be the "good" brow and the other... not so much. When shaping, always use your less-full brow as the template. It's far easier to remove hair from the fuller brow to match its sibling than it is to magically grow hair that isn't there.
Curly or Wavy Hairs: These hairs can be tricky. If you trim them while they're brushed up, they can look surprisingly short once they fall back into their natural curl. A great trick I've learned is to use a spoolie to gently press the hairs down against your skin, following your brow shape. Then, only snip the very ends that extend way past your desired outline.
Working With Your Growth Cycle
Patience is probably the most overlooked tool in any brow shaping kit. Your hair grows in a cycle that typically lasts 3 to 4 months, and you simply can't rush it. Timing your shaping sessions thoughtfully can make a huge difference, especially if you're in recovery from the over-plucking era of the early 2000s.
If you're trying to grow your brows back, you need to commit to putting the tweezers down for at least 6-8 weeks. I know, it's tough! But this break allows your natural growth pattern to fully emerge. During this sometimes-awkward phase, a good tinted brow gel or a pencil with a very fine tip can help you fill in the gaps and feel more put-together. This not only helps you get fuller brows in the long run but also teaches you to be much more selective about which hairs you remove later on.
It's also important to remember that genetics and our diverse cultural backgrounds here in Canada play a huge part in hair thickness and growth. The real secret to amazing brows isn't fighting your natural texture, but embracing it. Working with what you have is what creates brows that look authentic and uniquely yours.
Professional Techniques For Home Success
Having the right tools and a solid map are a great start, but the real artistry comes from bringing professional-level techniques into your at-home routine. These are the insider secrets that distinguish a quick clean-up from a truly polished look. Adopting just a few of these habits can seriously upgrade your results, helping you achieve that salon-fresh appearance right in your own bathroom.
Timing And Graceful Execution
One of the best pieces of advice from Canadian brow artists is to shape your brows right after a warm shower. The steam opens up your hair follicles, which softens the hairs and makes plucking much easier and less painful. Your skin is also clean and supple, which helps cut down on irritation or breakage. It’s a small change that makes a huge difference.
Another pro habit is the stepping-back method. It’s so easy to get hyper-focused when you’re leaning into the mirror, plucking hair after hair. This is exactly how over-plucking happens. After removing just two or three hairs from one brow, put the tweezers down, take a step back, and look at the bigger picture. This constant check-in helps you maintain symmetry and stops you from creating accidental gaps. Remember, shaping is a marathon, not a sprint.
Advanced Shaping Without Professional Tools
You don't need a full aesthetician's kit to get sophisticated results. With a bit of know-how, you can tackle common challenges like asymmetry and sparseness right at home.
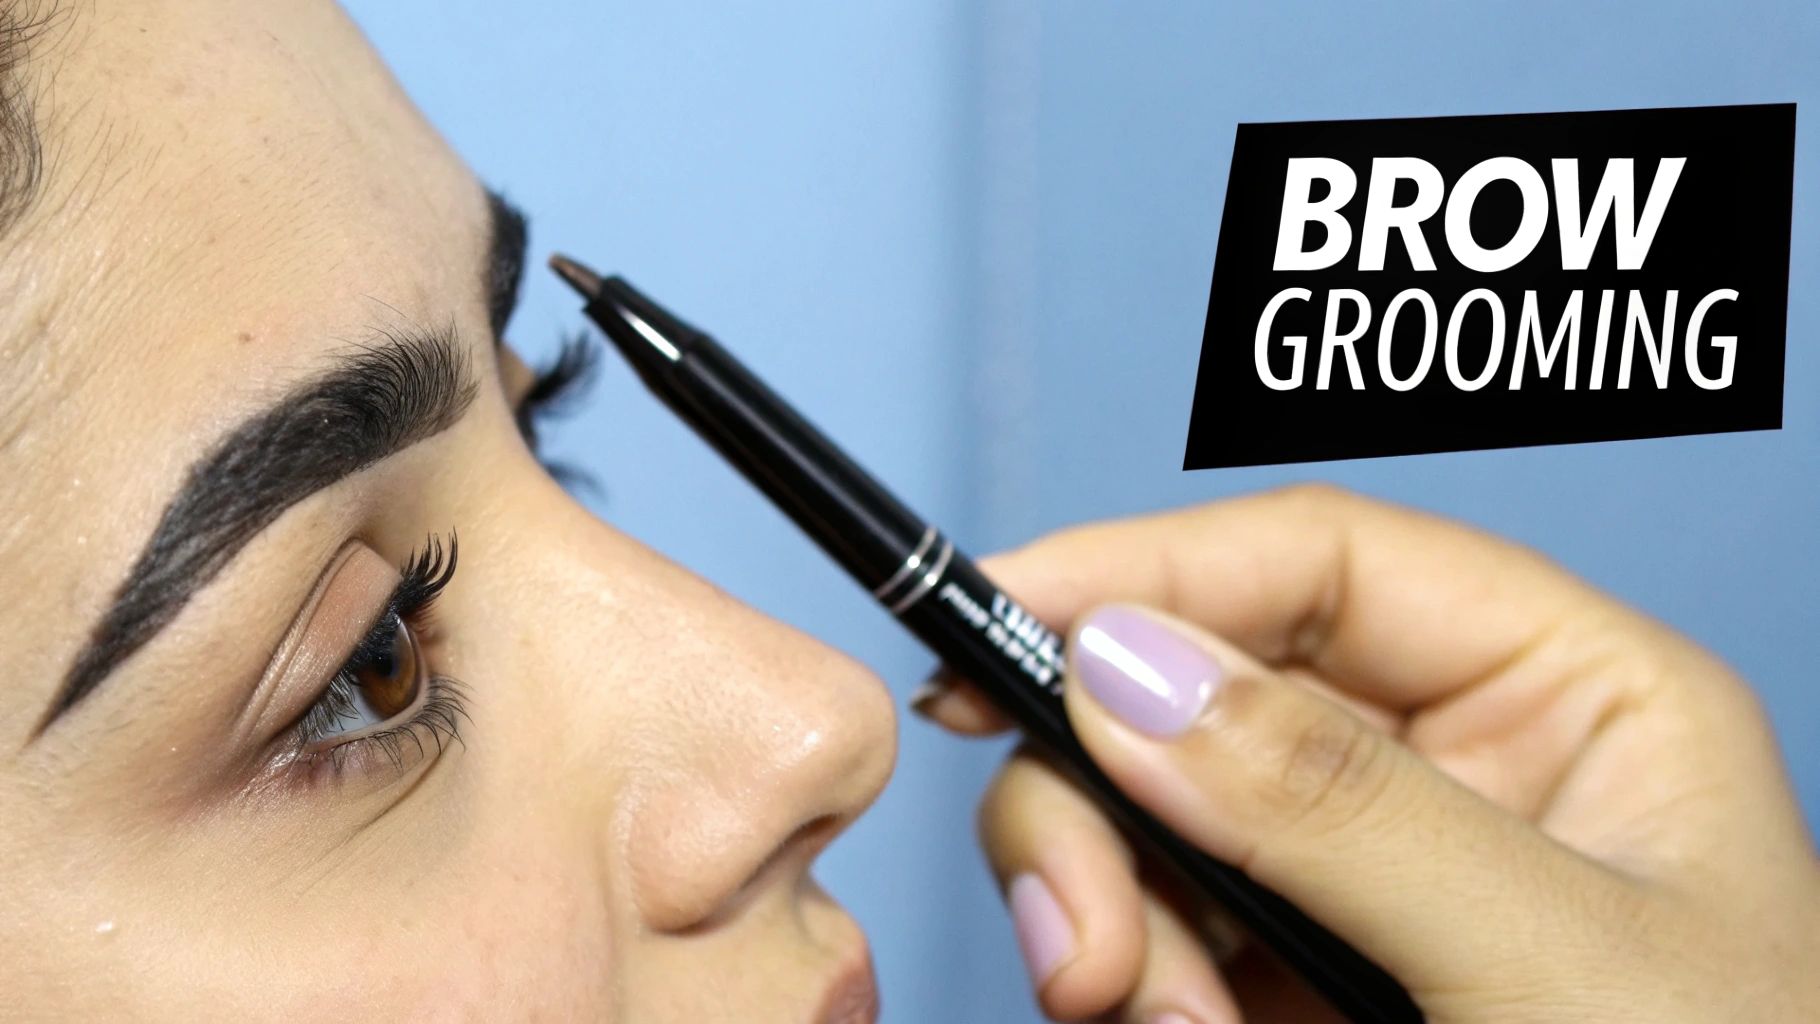
Creating Illusions of Fullness: If you have sparse areas, resist the urge to pluck around them to "even things out." Instead, grab a fine-tipped brow pencil and draw light, hair-like strokes in the gaps. Afterwards, brush through with a spoolie to blend everything together. This gives the look of density without sacrificing precious hairs.
Balancing Asymmetrical Brows: Here's a secret: almost nobody has perfectly symmetrical brows. The trick is to identify your "weaker" or sparser brow and use it as your guide. Your goal is to make the fuller brow match the sparser one, not the other way around. This conservative approach prevents you from getting carried away and removing too much.
Even with the best techniques, mistakes happen. If you accidentally create a bald spot, just leave it alone. Use a pencil to fill it in and give the hairs a few weeks to grow back. Knowing when you’ve reached your DIY limit is a skill in itself. For bigger corrections, exploring professional [eyebrows waxing services](https://www.skinsation.me/service-page/eyebrows-waxing) can be a fantastic way to get an expert reset.
The focus on well-groomed eyebrows as a central beauty feature has grown immensely. For example, industry data shows that eyebrow product sales surged by $50 million over four years, even while overall makeup sales were dropping. You can find more details about celebrity influence on brow trends at TheBrowFixx.com. The principles for achieving a polished look don't stop at your brows; many apply to broader [general facial grooming tips](https://www.myaifrontdesk.com/blog/expanding-your-service-offerings-shaving-and-beard-grooming-tips-for-men) as well. Mastering these techniques will empower you to maintain your ideal look with confidence.
Aftercare That Maintains Your Results
So, you've put down the tweezers or just walked out of the salon with perfectly sculpted brows. The journey doesn't end there—in fact, this is where the magic of keeping them fabulous begins. Proper aftercare is the secret weapon in any good eyebrow shaping guide. It's what ensures all that effort pays off with gorgeous, long-lasting results and healthy skin. Without it, you could be dealing with irritation, breakouts, or those annoying ingrown hairs that can totally ruin a perfect arch.
The first 24 hours post-shaping are critical. Your skin is extra sensitive, and the hair follicles are open, which makes them a prime target for bacteria. Your number one rule should be: hands off! Resisting the urge to touch your new brows is the best first line of defence. If you're seeing a bit of redness or swelling, a cold compress can be a lifesaver. A thin layer of pure aloe vera gel is another great move; it provides natural, soothing relief without clogging your pores.
Your Post-Shaping Maintenance Plan
After that initial sensitive period, your focus will shift to keeping your brows looking amazing for the long haul. This is where you can really protect your investment of time and effort and make that new shape pop.
Here are a few essential practices to work into your routine:
Avoid Harsh Products: For at least a day, keep exfoliants, retinoids, and any toners with alcohol away from your brow area. Give your skin the peace and quiet it needs to heal.
Stay Out of the Sun: Freshly tweezed or waxed skin is more prone to UV damage. When you're out enjoying the Canadian sun, make sure to apply a quality, non-comedogenic sunscreen to protect the area.
Moisturize Daily: The skin under and around your brows needs hydration just like the rest of your face. A lightweight, fragrance-free moisturizer will keep the skin supple and help prevent any dryness or flaking.
Establish a Schedule: Pay attention to your personal hair growth rate and set up a realistic maintenance routine. For most people, a quick cleanup with tweezers every few days, followed by a full reshaping every 3-4 weeks, is the perfect rhythm.
Enhancing Your Perfectly Shaped Brows
Once your shape is on point, you can have fun with different ways to amplify your look. Tinting, for example, can add incredible definition by colouring those fine, lighter hairs, giving you a much fuller look. If you're after a sleek, uniform style, professional treatments can set your brows in place for weeks. For anyone interested in that polished finish, you might want to learn more about [eyebrow lamination services](https://www.skinsation.me/service-page/eye-brow-lamination), which can deliver a stunning, long-lasting result.
The desire for defined, polished brows has created a huge demand for professional services. Techniques like threading offer amazing precision, and the influence of celebrity styles has helped turn brow grooming into a multi-million dollar business, particularly in major Canadian cities. This growth really shows how much people appreciate the power of a perfectly sculpted brow. You can find more details about the booming eyebrow grooming industry on california.com. By sticking to a solid aftercare and enhancement plan, you can make sure your brows always look their absolute best.
Fixing Mistakes and Moving Forward Confidently
Let's be real: we have all made a brow mistake. Whether it was a moment of overzealous plucking during a late-night movie, creating arches that look more like distant cousins than twins, or taking just one hair too many from a crucial spot, it happens. The goal isn't perfection, but learning how to fix mishaps and move on with your head held high. Think of it as a necessary part of this eyebrow shaping guide—every slip-up is a lesson learned.
The moment you realize you've gone too far can feel a bit panicky, but the first thing you need to do is simple: put the tweezers down. Step away from the mirror. Trying to "fix" the problem right away often just makes it worse. Your brows will grow back. The average hair growth cycle takes a few months, but you'll usually see the first signs of regrowth within 3-6 weeks. This is a realistic timeline to keep in mind. There are no overnight cures, but there are some great ways to manage the situation while you wait.
Camouflage and Correction Strategies
While nature does its thing, makeup is your secret weapon. The idea isn't to draw on a whole new brow, but to skilfully hide the mistake and create a balanced look. This is where you can really see the power of good products and techniques.
For Gaps or Over-Plucked Areas: A micro-fine brow pencil is your most valuable tool here. Instead of colouring in the bare patch, use light, feathery strokes that look like natural hairs. Always draw in the direction your hair grows. Once you've filled it in, use a spoolie to gently brush through the area. This softens the lines and blends the product for a seamless finish.
For Uneven Arches: Stand back and look at your face straight-on in a well-lit mirror. Figure out which brow is higher or has the shape you prefer. Your goal is to use that "better" brow as your guide. On the brow that needs correcting, use your fine-tipped pencil to lightly sketch in the shape underneath to lower the arch, or fill in the top to raise it. This helps create a more symmetrical appearance.
When One Brow Is Too Thin: Whatever you do, don't try to make the fuller brow match the thinner one—that’s a quick way to get super-skinny brows. Instead, focus on building up the thinner brow. I like to use a combination of a pencil for definition and a brow powder or tinted pomade to add a look of density and fullness.
The Realistic Path to Recovery
Patience is key, especially when it comes to brow regrowth. To help the process along, it's so important to leave the area completely alone. That means no tweezing, no waxing, and no threading near the spots you’re trying to grow back. You can, however, use this time to focus on brow health. Applying a tiny bit of castor oil or a good growth serum at night can help condition the hairs and the skin underneath.
It’s also important to know when to call in a professional. If you feel like your brows are beyond a simple makeup fix or you’re just stuck in a cycle of shaping mistakes, booking an appointment with an aesthetician is a really smart move. They can look at your current situation, map out a long-term recovery plan, and give you a professional shaping that works with your current growth. This gives you a clean slate to maintain at home and can do wonders for your confidence.
Learning to manage your brows—mistakes and all—is a skill that builds confidence. They are, after all, a reflection of your personal style.
If you’re ready to get your ideal brow shape with professional guidance, the experts at Skinsation Aesthetics Inc. are here to help. Our brow and lash services are designed to bring out your natural beauty and give you flawless, confidence-boosting results. Discover your perfect brows by booking an appointment at Skinsation Aesthetics today!
Comments