
How to Shape Eyebrows at Home: A Complete Guide
- Blog Admin

- Aug 16, 2025
- 13 min read
Before you even think about touching a single hair, the first step is always getting your tools in order. Knowing how to shape your eyebrows at home really starts with having the right equipment ready to go. A proper toolkit gives you complete control for a clean, polished look and, more importantly, helps prevent those common mistakes like uneven arches or taking off way too much. It all comes down to precision and preparation.
Gathering Your Brow Shaping Toolkit
Think of it like an artist prepping their canvas and brushes; having quality tools makes the whole process smoother and the final result look so much more professional. This isn't the time to just grab any old pair of tweezers you find in the back of a drawer. We're talking about setting yourself up for success with a kit that gives you confidence and control.
For anyone here in London, Ontario, or across Canada, finding great tools is thankfully pretty easy. Most drug stores and beauty supply shops will have everything you need. My advice? Invest in good tools from the start. They work so much better and will last you for ages.
Here's a quick rundown of the must-haves for your at-home brow shaping kit.
Your Essential At-Home Brow Shaping Kit
This table breaks down the absolute must-have tools you'll need, what they do, and why they're so important for getting those perfect brows.
Tool | Primary Use | Why You Need It |
|---|---|---|
Slanted Tweezers | Plucking individual stray hairs from the root. | A high-quality pair provides a sharp, angled edge to grip fine hairs firmly without breaking them, ensuring a clean pull every time. |
Spoolie Brush | Brushing brow hairs up and into place. | This is essential for seeing your natural brow shape and identifying which hairs actually need to be trimmed or tweezed. |
Small Brow Scissors | Trimming long or unruly brow hairs. | Their small, sharp blades allow for precise snips, cleaning up the brow line without accidentally creating gaps. |
Having these three core items will handle most of the heavy lifting, from grooming and trimming to the actual removal of stray hairs.
Why Lighting and Mirrors Matter So Much
Okay, let's talk about something that's just as important as your tools: your setup. You can have the best tweezers in the world, but if you can’t see what you're doing, you're basically shaping your brows in the dark. This is where so many mistakes happen.
The single biggest mistake I see people make when shaping their brows at home is using a dimly lit bathroom mirror. Natural daylight is your absolute best friend—it reveals every single hair, making sure you don’t miss any strays or accidentally over-pluck.
Try to set yourself up near a window with lots of natural light. If that’s just not possible, a bright lamp with a white light is the next best thing.
A magnifying mirror can also be a huge help for spotting those super-fine hairs, but please use it with caution! It’s incredibly easy to lose perspective and go overboard when you're zoomed in that close. My pro tip is to use it for the detailed work, but then frequently step back and check your progress in a regular mirror. This helps you keep an eye on the bigger picture, ensuring your brows stay balanced and symmetrical. With the right tools and the right setup, you're ready for flawless results.
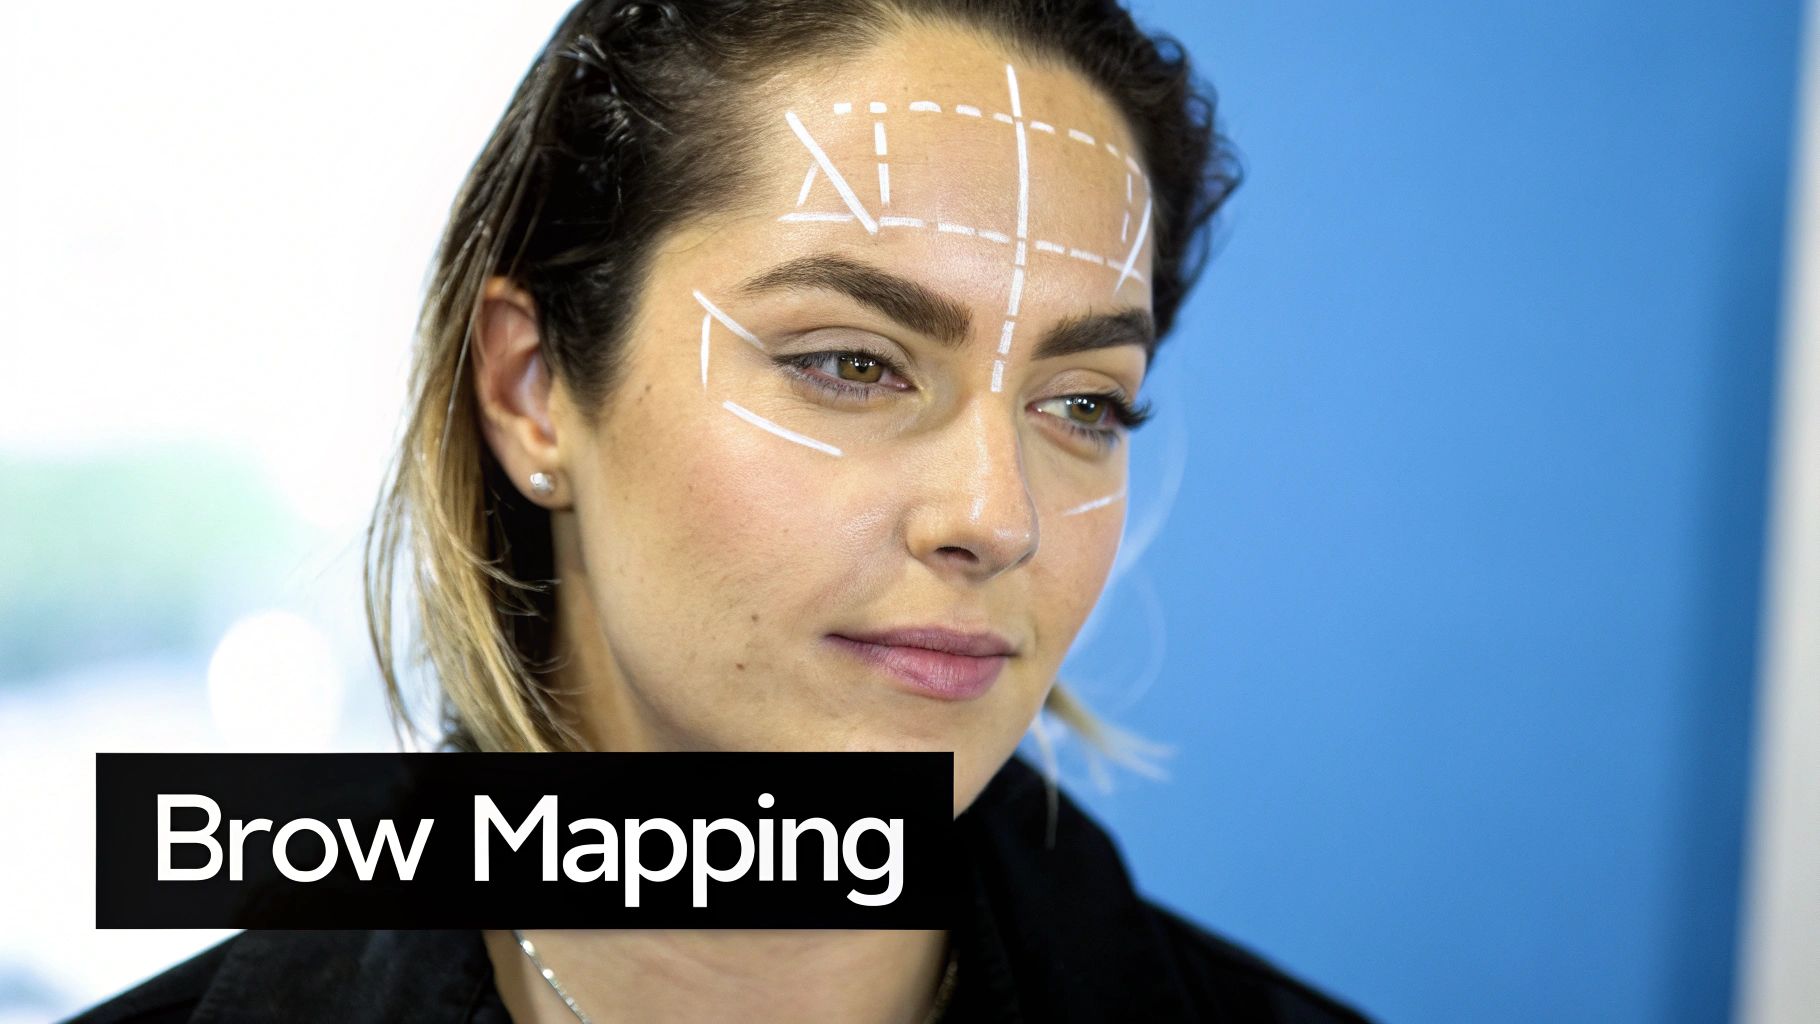
Mapping Your Perfect Eyebrow Shape
The real secret to incredible eyebrows isn’t about chasing the latest trend—it’s about defining a shape that brings balance and harmony to your unique facial features. This is where brow mapping comes in, and honestly, it’s the most powerful tool in your at-home brow kit. It’s a pretty straightforward method that completely takes the guesswork out of shaping, giving you a precise blueprint to follow for a symmetrical, flattering look.
Forget trying to eyeball where your brows should start or end. We’ve all been there, and it usually ends in frustration. Brow mapping uses key points on your face—mainly your nose and eyes—to create a framework just for you.
This guarantees the final shape is perfectly proportioned, helping you avoid those classic pitfalls like making brows too short, too thin, or putting the arch in a weird spot. Getting this simple process down is fundamental to learning how to shape your eyebrows at home like a pro.
This image shows you the essential tools you’ll want to have on hand before you get started.
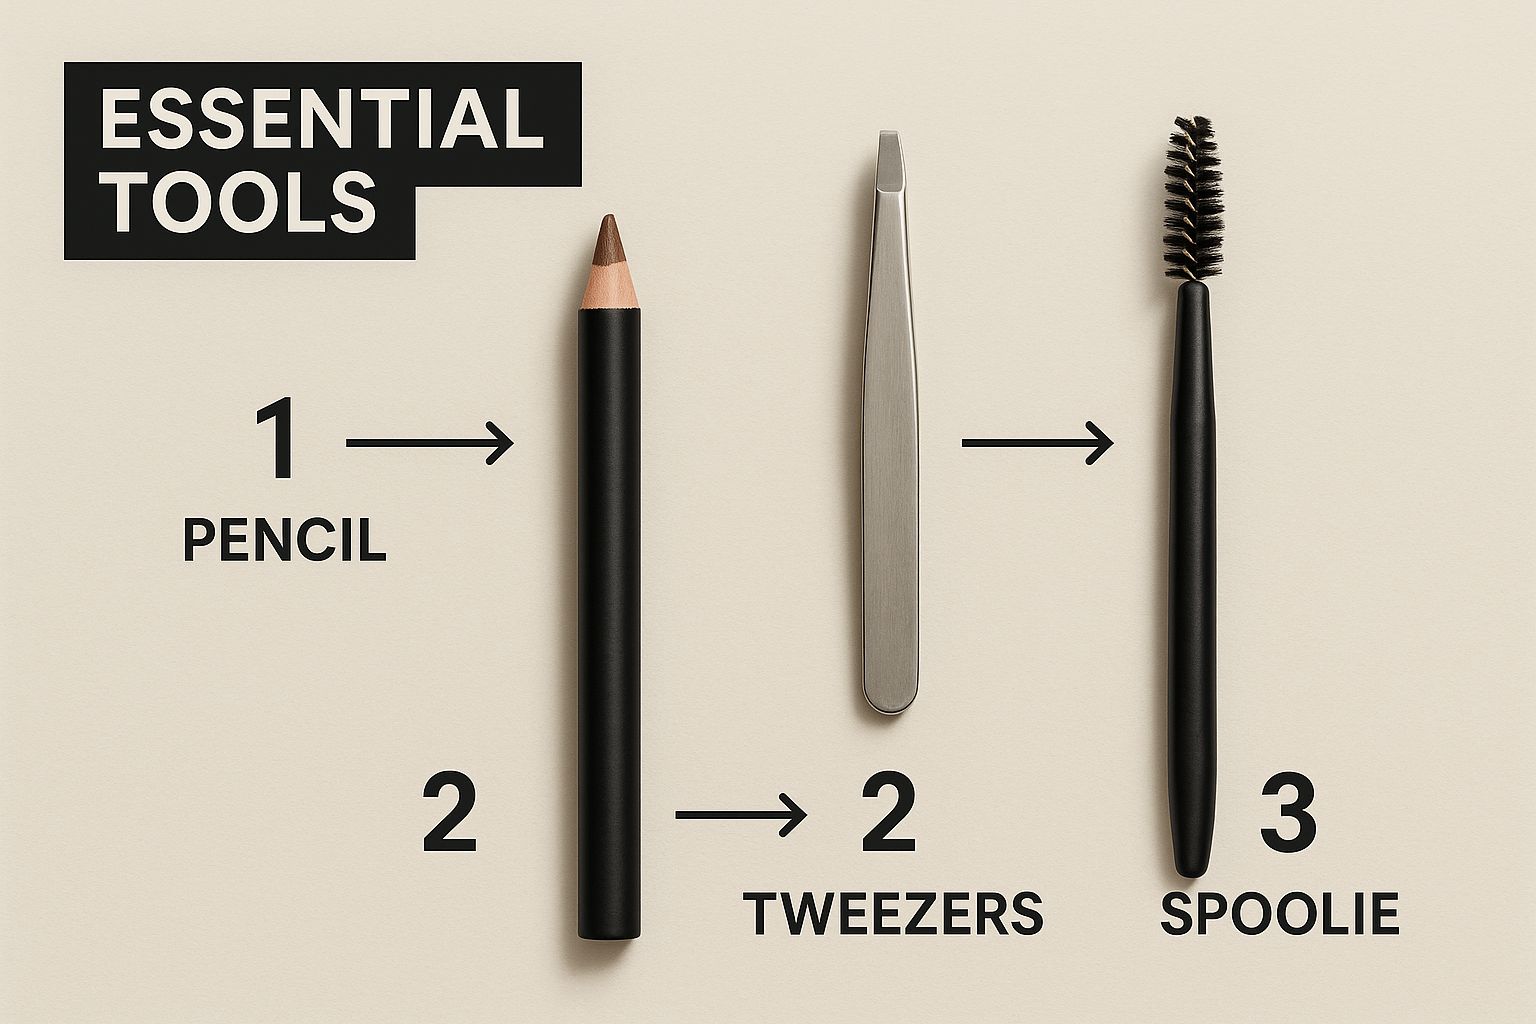
Having these tools laid out and ready to go just makes the whole mapping and shaping process feel more controlled and professional. Trust me, it helps.
Pinpointing Your Three Key Brow Points
The classic three-point mapping method is your best friend here. It’s simple, and all you need is a long, straight tool. A brow pencil, the handle of a makeup brush, or even a cuticle stick will work perfectly. You’re going to use this to find and mark three critical points for each brow.
Finding Your Starting Point: Place your tool vertically along the side of your nose, lining it straight up with the inner corner of your eye. Where the tool hits your brow line? That’s where your eyebrow should begin. Make a tiny mark there with your brow pencil.
Locating Your Arch: Now, keep the bottom of the tool anchored at the side of your nostril. Angle it diagonally so it slices right across the centre of your pupil. The spot where that line crosses your brow bone is the ideal place for the highest point of your arch. Go ahead and mark it.
Determining Your End Point: One last time, keep the tool at the side of your nostril and pivot it outwards until it lines up perfectly with the outer corner of your eye. This marks the spot where your eyebrow tail should taper off. Make your final mark.
Once you have these three marks, you can lightly connect them with your pencil, drawing the top and bottom outlines of your ideal brow shape. This creates a clear boundary, showing you exactly which hairs to remove and—just as importantly—which ones to leave alone.
Creating Your Custom Blueprint
With your points marked and your outline sketched in, you officially have a custom guide. Think of this visual map as your safety net. It’s what stops you from getting tweeze-happy and ensures both your brows look like sisters, not distant cousins. It’s a simple step that makes a world of difference, especially if you’re new to this.
Remember, the goal here is to enhance your natural shape, not to draw on a completely new one. For a deeper dive into techniques that really flatter your features, our complete **eyebrow shaping guide** has even more tips to help you master perfect brows at home. The idea is to work with what you’ve got to create a polished, balanced frame for your beautiful eyes.
Mastering the Art of Trimming and Tweezing
Alright, you've got your brow map in place, which is basically the perfect blueprint for your ideal shape. Now for the fun part: bringing that vision to life. This is where we get into the nitty-gritty of trimming and tweezing, the two most critical steps in any at-home brow routine.
This isn't about a massive hair overhaul. It’s all about precision. We're only going to touch the hairs that fall outside the lines you've so carefully mapped out. The whole point is to get a clean, defined look without making your brows look thin or sparse.
And remember the golden rule: you can always take more off, but you can't put hairs back on. Patience is everything right now.
The Art of a Proper Trim
Before you even pick up the tweezers, you need to deal with any long, unruly hairs. A good trim is the real secret to that polished, well-groomed look that seems effortlessly neat.
First up, grab a clean spoolie and brush all your brow hairs straight up, aiming for your hairline. This one simple move instantly shows you which hairs are a bit too long and are peeking over the top line of your desired shape.
With a small pair of brow scissors, you’re just going to snip the very tips of the hairs that are sticking out. Seriously, we’re talking a millimetre or two, max. The trick is to snip them one by one—or in tiny little sections—so you don't accidentally create a blunt, choppy line.
Precision Tweezing Techniques
Once the trimming is sorted, it’s time to tweeze. This is purely for removing the strays that are hanging out beyond the beautiful shape you mapped earlier.
Here’s how to do it right:
Hold the Skin Taut: Use your free hand to gently pull the skin around your brow tight. This gives you a firm surface, which makes it way easier for the tweezers to get a good grip and helps reduce any sting.
Pluck in the Direction of Growth: Take a close look at which way your hair grows and pull in that exact direction. If you pluck against the grain, you risk breaking the hair, which can lead to pesky ingrowns.
Remove Hairs One by One: I know it's tempting, but resist the urge to grab a few hairs at once. Focusing on a single hair at a time is the best way to make sure you don't create gaps or accidentally thin out your brows.
A key piece of advice: focus only on the stray hairs underneath your brow and between your brows. Unless you have a lot of growth above your brow, it's almost always best to leave that top line alone. That's how you maintain a full, natural-looking arch.
It's amazing how much focus has shifted to eyebrow care in Canada. Market data reveals that while adults aged 31-50 make up a significant portion of the revenue share for eyebrow makeup, it's the younger Canadians aged 20-30 who are really driving growth, at a rate of 9.5% annually. This group tends to lean into natural, low-maintenance looks like "fluffy brows," which really shows how skillful shaping has become more important than just covering things up with makeup. We're even seeing eyebrow makeup use among men rise, proving just how universal the desire for well-groomed brows has become. You can dig into more eyebrow product market trends and insights to see how grooming habits are evolving.
At the end of the day, successful at-home brow shaping is a game of millimetres. Just take your time, step back from the mirror often to check your progress, and trust the outline you created. This careful approach is what separates a DIY disaster from a result that looks like you just left the salon.
Applying Finishing Touches and Aftercare
Great brows don't just happen once the last stray hair is gone. The real artistry comes from the finishing touches that create a polished, defined look, and the aftercare that keeps your skin happy and calm. This final stage is what takes your at-home shaping from good to genuinely professional-looking.
Once you’re happy with the shape you’ve created, it’s time to add a bit of definition. Most of us have a few sparse areas, and filling them in makes a huge difference. Your product choice—whether it's a pencil, powder, or pomade—really depends on the look you're going for.
For a soft, natural finish, I always recommend using light, feathery strokes that mimic your actual brow hairs. Remember to start with a light hand; you can always build up the colour. The trick is to focus on filling the gaps, not drawing on a completely new shape. This ensures your brows look naturally full, not stamped on.

Locking Your Look in Place
After filling in any sparse spots, the next step is to set your brows. A quick swipe of a clear or tinted brow gel will lock every single hair in place, making sure your perfectly groomed shape lasts all day long.
Just brush the hairs up and out with the gel wand, following the natural direction of your hair growth. This little step not only sets your brows but also adds a bit of texture and volume, giving you a fuller appearance.
Pro Tip: If you find your brow hairs are particularly unruly, a clear brow gel is a non-negotiable step. Think of it as a gentle hairspray for your brows, taming any stubborn hairs and maintaining that clean, sharp line you worked so hard to create.
For those of you looking to encourage even more natural fullness over time, there are plenty of methods to explore. You can learn more by checking out our Canadian guide on how to get thicker eyebrows naturally for some extra tips.
Soothing Your Skin Post-Shaping
Proper aftercare is just as crucial as the shaping itself. Tweezing can leave the delicate skin around your eyes a little red and sensitive, so it’s important to soothe the area right away to prevent irritation.
Calm the Redness: Applying a small amount of aloe vera gel or even a cold compress can work wonders. This helps to reduce inflammation and calm any immediate redness.
Avoid Irritants: For the first few hours after tweezing, it’s best to avoid applying makeup or any potent skincare products directly on the area. Steer clear of things like retinoids or acid-based exfoliants, which can sting and irritate the freshly plucked follicles.
Giving your skin this brief recovery period helps prevent clogged pores and breakouts in that sensitive brow area. A little bit of care goes a long way in making sure your skin looks just as good as your newly shaped eyebrows.
Common Brow Shaping Mistakes to Avoid
We’ve all been there. You stand in front of the mirror, tweezers in hand, intending to grab just one stray hair. Then another. And another. Before you know it, one extra pluck has turned into a patchy, uneven brow disaster. Learning how to shape your eyebrows at home is just as much about knowing what not to do as it is about what to do.
Avoiding a few common pitfalls can be the difference between a polished, professional look and a brow shaping session you'll regret for the next few weeks.
The most common mistake, by far, is over-plucking. It's so easy to get carried away when you're leaning into the mirror, focused on achieving perfect symmetry. But when you get too caught up in the tiny details, you lose sight of the bigger picture. This is how brows end up too thin, too short, or with that dreaded tadpole shape.
Another classic error is creating an arch that’s too sharp or sits unnaturally high on your brow bone. This can leave you with a permanently surprised or even severe expression. Your natural arch is your best friend here—the goal is to enhance it, not force it into a whole new shape.
The Dangers of an Uneven Shape
Nothing is more frustrating than ending up with brows that look like distant cousins instead of sisters. This usually happens when you try to perfect both brows at the same time, switching back and forth erratically. A much safer approach is to work on one brow at a time, but only tweezing a few hairs before you stop, step back, and move to the other side to match your work.
A simple strategy to prevent over-plucking and asymmetry is to fill in your desired shape *before* you tweeze a single hair. Use a soft brow pencil to create your perfect outline. This creates a clear “do-not-touch” zone, making it easy to see which hairs are truly strays and need to go.
Think of this prep step as your safety net. It keeps you on track and prevents you from getting carried away with the tweezers. Honestly, it's a total game-changer for building confidence and getting flawless results every time.
Ignoring Your Natural Shape
Perhaps the biggest mistake of all is fighting against the brow shape you were born with. Trying to force a trendy arch or a super-straight style onto brows that don't naturally grow that way will always look a bit off, not to mention require constant, frustrating maintenance. The best thing you can do is embrace what you have and focus on cleaning it up.
It's clear that well-shaped eyebrows have become a central part of beauty routines over the last two decades. Beauty experts now widely recognize them as key elements for facial balance, leading to a huge increase in both at-home care and professional services. This growing consumer focus highlights that grooming is not just a trend but an essential part of feeling confident and put-together.
When it comes to the actual hair removal, it’s also a mistake to just pick any method without understanding the pros and cons. While tweezing gives you incredible precision, some people find other methods work better for them. Our guide comparing eyebrow threading vs waxing can help you decide what's best for your skin and hair type, even if you're just cleaning up between professional appointments here in London, Ontario.
By avoiding these common errors, your at-home shaping will look clean, balanced, and effortlessly beautiful.
When to See a Professional at Skinsation Aesthetics
Knowing how to shape your own eyebrows is a fantastic skill to have in your back pocket. But let's be real, sometimes the best tool for the job is your phone, dialling up a professional. While DIY touch-ups are perfect for keeping things tidy, there are definitely times when handing over the tweezers to an expert is the smartest move for your brows.
Think of it like trimming your own fringe between salon visits versus going in for a whole new haircut. The same idea applies here. If you've had a bit of a shaping mishap—maybe you got a little enthusiastic with the tweezers and now have a gap—an artist can step in. They’ll work their magic to create a recovery plan, reshaping what’s left and giving you a strategy for growing back those over-plucked spots.
Seeking an Expert for Advanced Treatments
Another key time to book an appointment is if you're dreaming of a total brow makeover or considering any treatments that involve chemicals. Services like a Brow Lamination & Tint are absolutely not something to try at home. These treatments need a deep understanding of chemical processes and hair structure to get that gorgeous, fluffy, defined look without damaging your skin or brow hairs.
For anyone in London, Ontario, looking for that flawless, polished finish, the Brow Lamination & Tint at Skinsation Aesthetics is a perfect example of what a pro can do. A professional treatment makes sure the results are even, stunning, and last for weeks.
When you're after a dramatic change or a low-maintenance look that actually lasts, a professional has the training and the products to deliver results that DIY methods just can't safely match. It's an investment in getting the look you want without the risk.
The Value of Professional Expertise
There's a good reason the professional beauty industry is becoming more regulated. Treatments like eyebrow lamination—which is basically a perm for your brows to give them a fuller, lifted look—are often now included under an Esthetician’s license. This ensures that the person performing the service has the proper training to do it safely.
Considering these treatments last for a good 4 to 6 weeks, going to a licensed professional is the only way to go. You can learn more about why professional brow treatments are regulated and why it's so important.
Ultimately, a professional brow artist offers so much more than just shaping. They bring an expert eye for what will best suit your unique face shape, have access to high-quality products, and provide the peace of mind that comes with safe, beautiful results.
Ready to leave it to the professionals for a truly stunning result? Skinsation Aesthetics offers expert brow services, including lamination and tinting, to give you the perfect shape with zero stress. Book your appointment with us today
Comments